Projected retopology
Assign one or more High Poly sources and create or edit topology directly on their surfaces using the current Offset.
A practical guide to installing retoPoly, activating an online license, setting up the modifier, and using the current tools, mouse gestures, viewport aids and keyboard shortcuts.
retoPoly combines projected topology creation, brush-based editing, direct component operations and stack-aware viewport aids in a modifier-owned workflow.
Assign one or more High Poly sources and create or edit topology directly on their surfaces using the current Offset.
Committed geometry operations participate in the normal 3ds Max Undo and Redo workflow.
The floating tool palette belongs to the selected retoPoly modifier. It hides when another object, base object or modifier entry becomes active.
Tools display live previews, highlighted components and status text near the cursor. Read that text when a gesture changes mode.
Show Cage keeps the authored low-poly topology readable under modifiers such as TurboSmooth, while native Vertex Ticks are enabled automatically whenever retoPoly is the active stack entry.
.dlm that matches the installed 3ds Max release.C:\Program Files\Autodesk\3ds Max <release>\Plugins\..dlm directly into that Plugins folder.Program Files..dlm in the Plugins folder, then restart 3ds Max.License requests, activation and deactivation are handled online from the License rollout.
Select the low-poly or retopology object and apply retoPoly from the MLtools category.
Use Add HP... in Parameters and choose one or more reference surfaces. Remove and Clear manage the source list. Tool buttons remain unavailable until a valid High Poly source is assigned.
Use a small positive Offset to keep projected points slightly above the reference surface and avoid z-fighting.
The floating palette opens automatically when the retoPoly modifier entry is active. Choose a tool and follow the context-aware viewport hint beside the cursor.
| Control | What it does |
|---|---|
| Open retoPoly UI | The floating palette opens automatically while retoPoly is the active modifier entry. This button is a manual show/hide fallback. |
| High Poly sources | The list contains all projection targets used by projection-aware tools and Live Conform. |
| Add HP... | Add one or more High Poly source nodes. Existing sources remain in the list. |
| Remove / Clear | Remove the selected High Poly source or clear the complete source list. |
| Live Conform | Immediately conforms the authored retopology to the High Poly source set and continues conforming later tool edits while enabled. |
| Offset | Offsets projected results from the High Poly surface. It is used by projection-aware creation, editing and conform operations. |
| Auto Weld | Allows eligible vertices created or moved by the active operation to weld to nearby valid targets. |
| Auto Weld threshold | Maximum weld distance. Keep the value conservative to avoid collapsing intended small details. |
| Show Cage | Displays the authored retoPoly control topology while upper stack results such as TurboSmooth are visible through Show End Result. |
| Cage color | Click the color swatch beside Show Cage to choose the cage line color. The color is stored with the modifier. |
| Inspect Topology | Opens the Topology Inspector. It reports live vertices/edges/faces, isolated vertices, loose and boundary edges, degenerate faces, quads, triangles and N-gons. Show highlights triangles/N-gons; Cleanup removes orphan vertices and loose edges; Repair also removes degenerate faces and rebuilds adjacency. |
| Move to 0: X / Y / Z | Moves the current selected vertices, or the endpoints of the current edge selection, onto the true world-space X=0, Y=0 or Z=0 plane. Object transforms and object offsets are respected, so Reset XForm/collapse is not required. Live Conform is bypassed for this command so the selected axis remains exactly zero. |
| Vertex Ticks | While retoPoly is selected in the modifier stack, retoPoly turns on 3ds Max's native Object Properties > Vertex Ticks display for the edited node. It is turned off again when you leave the retoPoly stack entry. |
| Shortcuts List | Opens the built-in searchable mouse/keyboard reference. The window remembers its last screen position and size independently from the main retoPoly palette. |
The number keys toggle the most frequently used tools. Pressing the key of an active tool stops it. The built-in Shortcuts List and the viewport cursor hints use the same current interaction mapping documented below.
| Key | Action |
|---|---|
| 1 | Activate or toggle Edit Flow. |
| 2 | Activate or toggle Fast Loop. |
| 3 | Activate or toggle Cut. |
| 4 | Activate or toggle Relax. |
| 5 | Activate or toggle Transform. |
LMB is the left mouse button, RMB is the right mouse button, and double-click means two rapid left clicks. Hold modifier keys before pressing LMB and keep them held during the gesture.
Draws surface-following contour rings and creates a projected quad band between consecutive rings. It can also continue from an existing open retopology border.
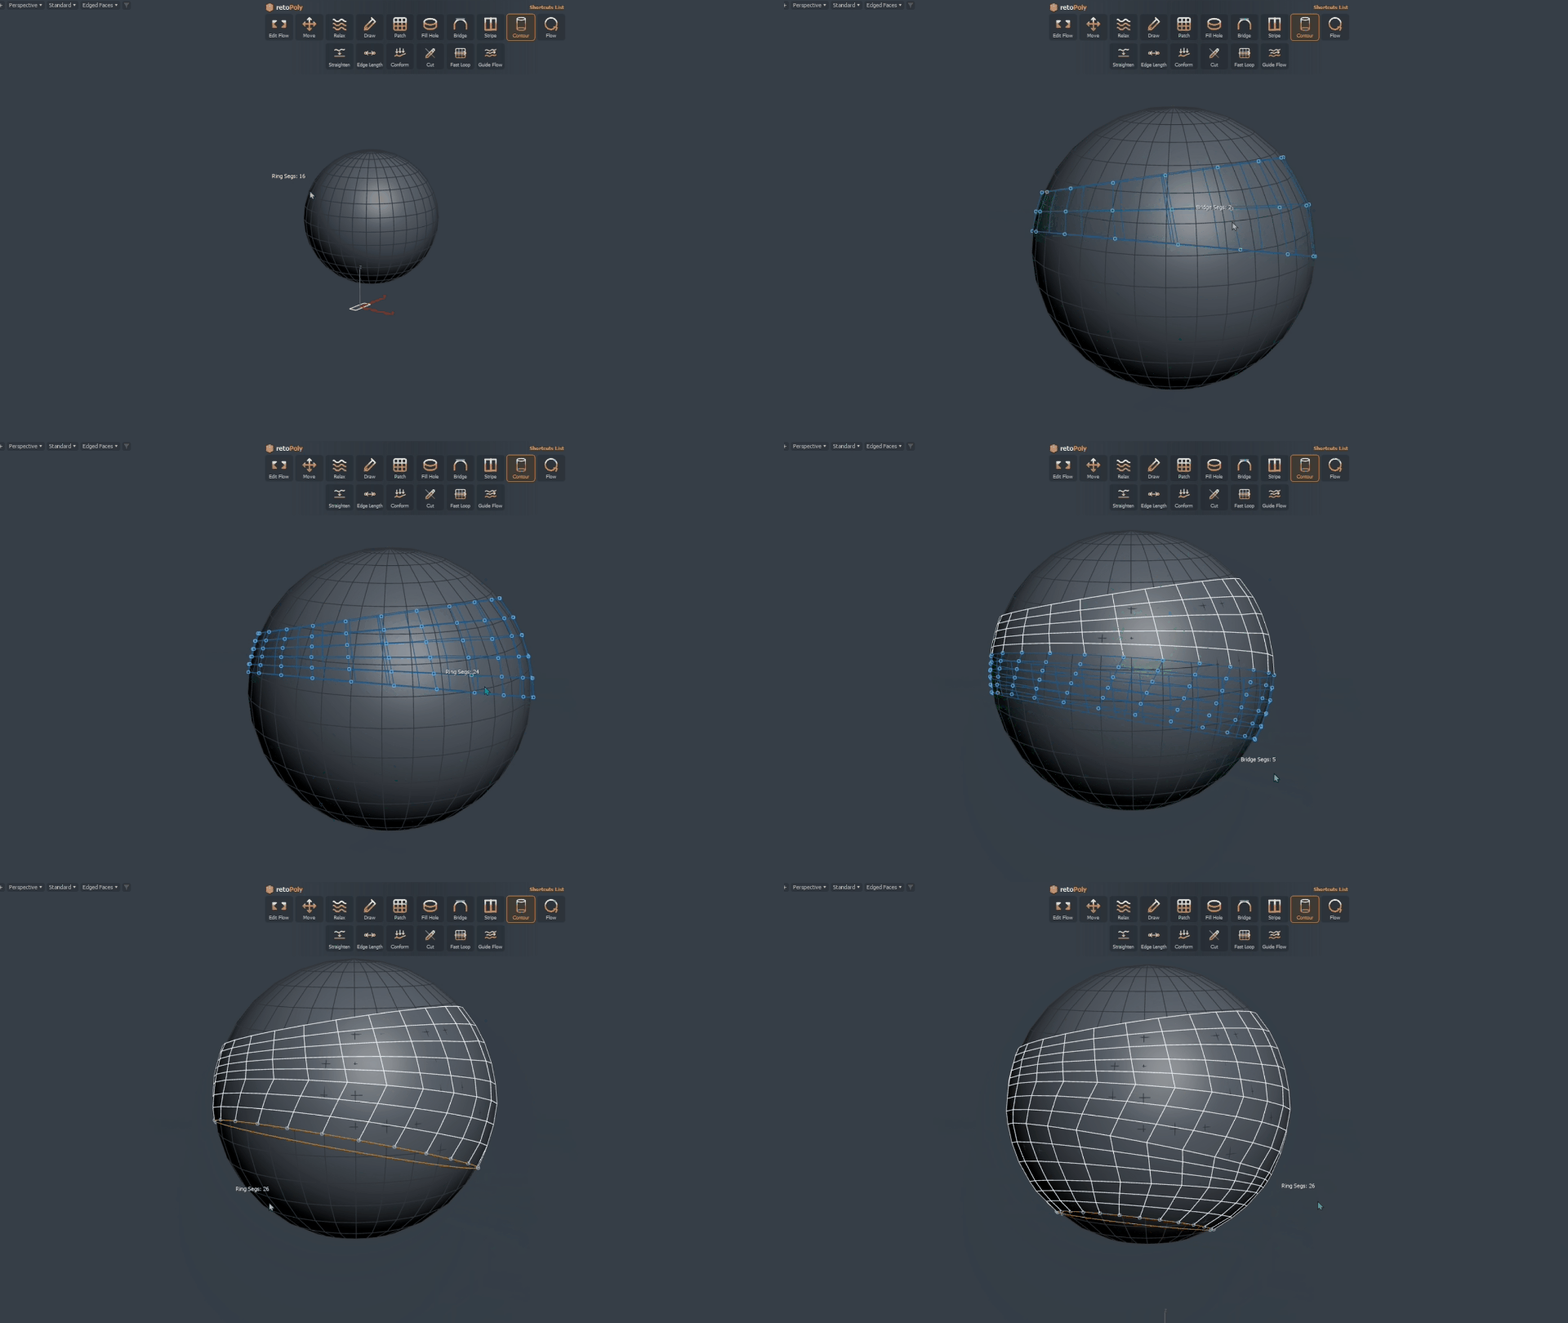
| Input | Action |
|---|---|
| LMB drag | Draw the first or next contour ring stroke. |
| Ctrl + LMB drag | Adjust ring segment count. |
| LMB drag on a pending band | Adjust bridge segment count. |
| Alt + LMB drag | Twist / rotate the current ring. |
| Shift + LMB click or drag | Restore / keep the current ring straight and parallel. |
| Shift + Alt + LMB drag | Move / slide the current ring preview. |
| Ctrl + Shift + LMB | Load the open retopo border under the cursor and continue from it. |
| RMB | Commit the pending band and continue. With no pending band, exit. |
Builds a projected quad bridge between two open border chains or loops.
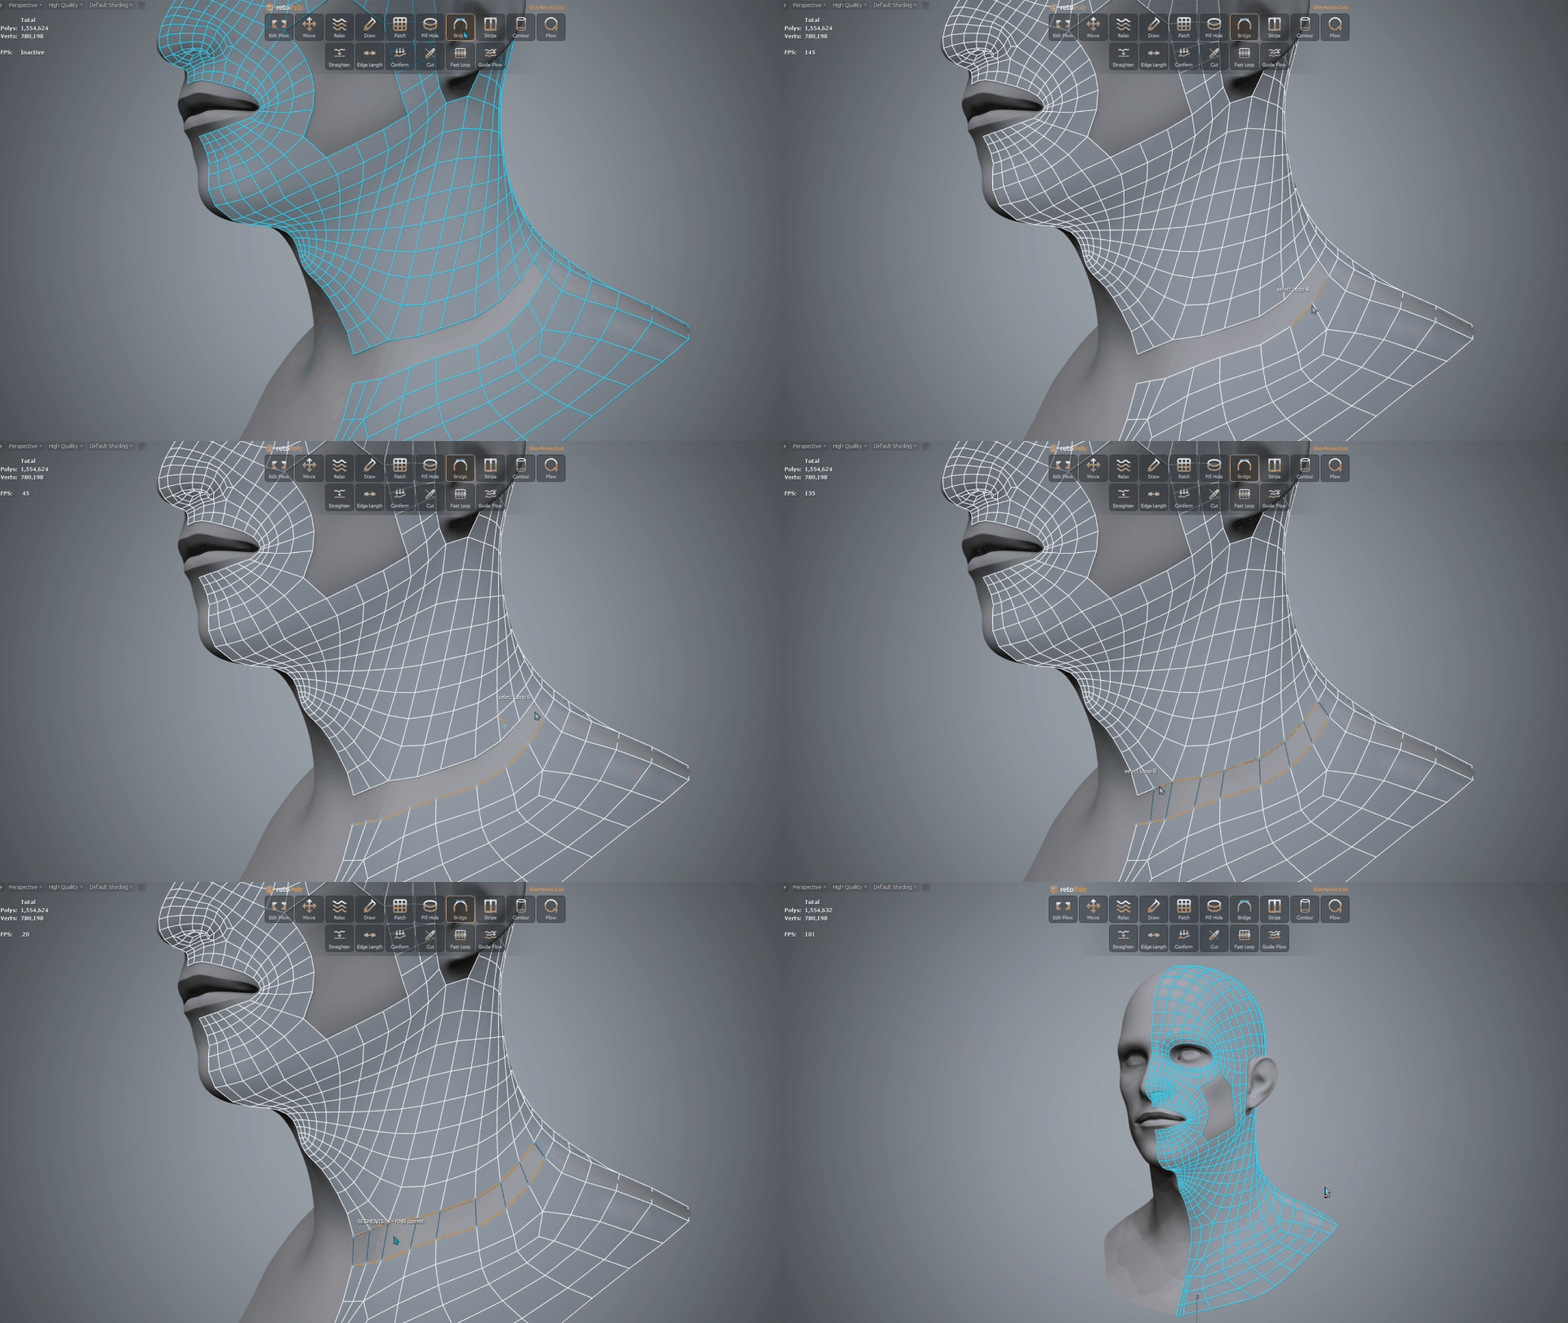
| Input | Action |
|---|---|
| Shift + LMB drag | Paint edges into Loop A. |
| Ctrl + LMB drag | Paint edges into Loop B. |
| Shift + double LMB | Load the full open border into Loop A. |
| Ctrl + double LMB | Load the full open border into Loop B. |
| Shift + Alt + LMB drag | Remove edges from Loop A. |
| Ctrl + Alt + LMB drag | Remove edges from Loop B. |
| LMB drag after A + B are valid | Adjust bridge segment count. |
| Alt + RMB | Clear the current bridge preview without exiting. |
| RMB | Commit the bridge and continue. With no preview, exit. |
Caps an open border with a projected quad grid. It can also delete painted faces and immediately rebuild a cap for the resulting opening.
| Input | Action |
|---|---|
| LMB click | Create a cap preview for the hovered open border. |
| Shift + LMB drag | Adjust cap subdivision pairing. |
| Ctrl + LMB drag | Rotate cap alignment around the border. |
| Alt + LMB drag | Paint faces to delete; release deletes them and refreshes the cap preview. |
| Alt + RMB | Delete the current cap preview. |
| RMB | Commit the cap and continue. With no preview, exit. |
Draws a multi-row quad strip with editable knots, subdivisions, width and end taper.
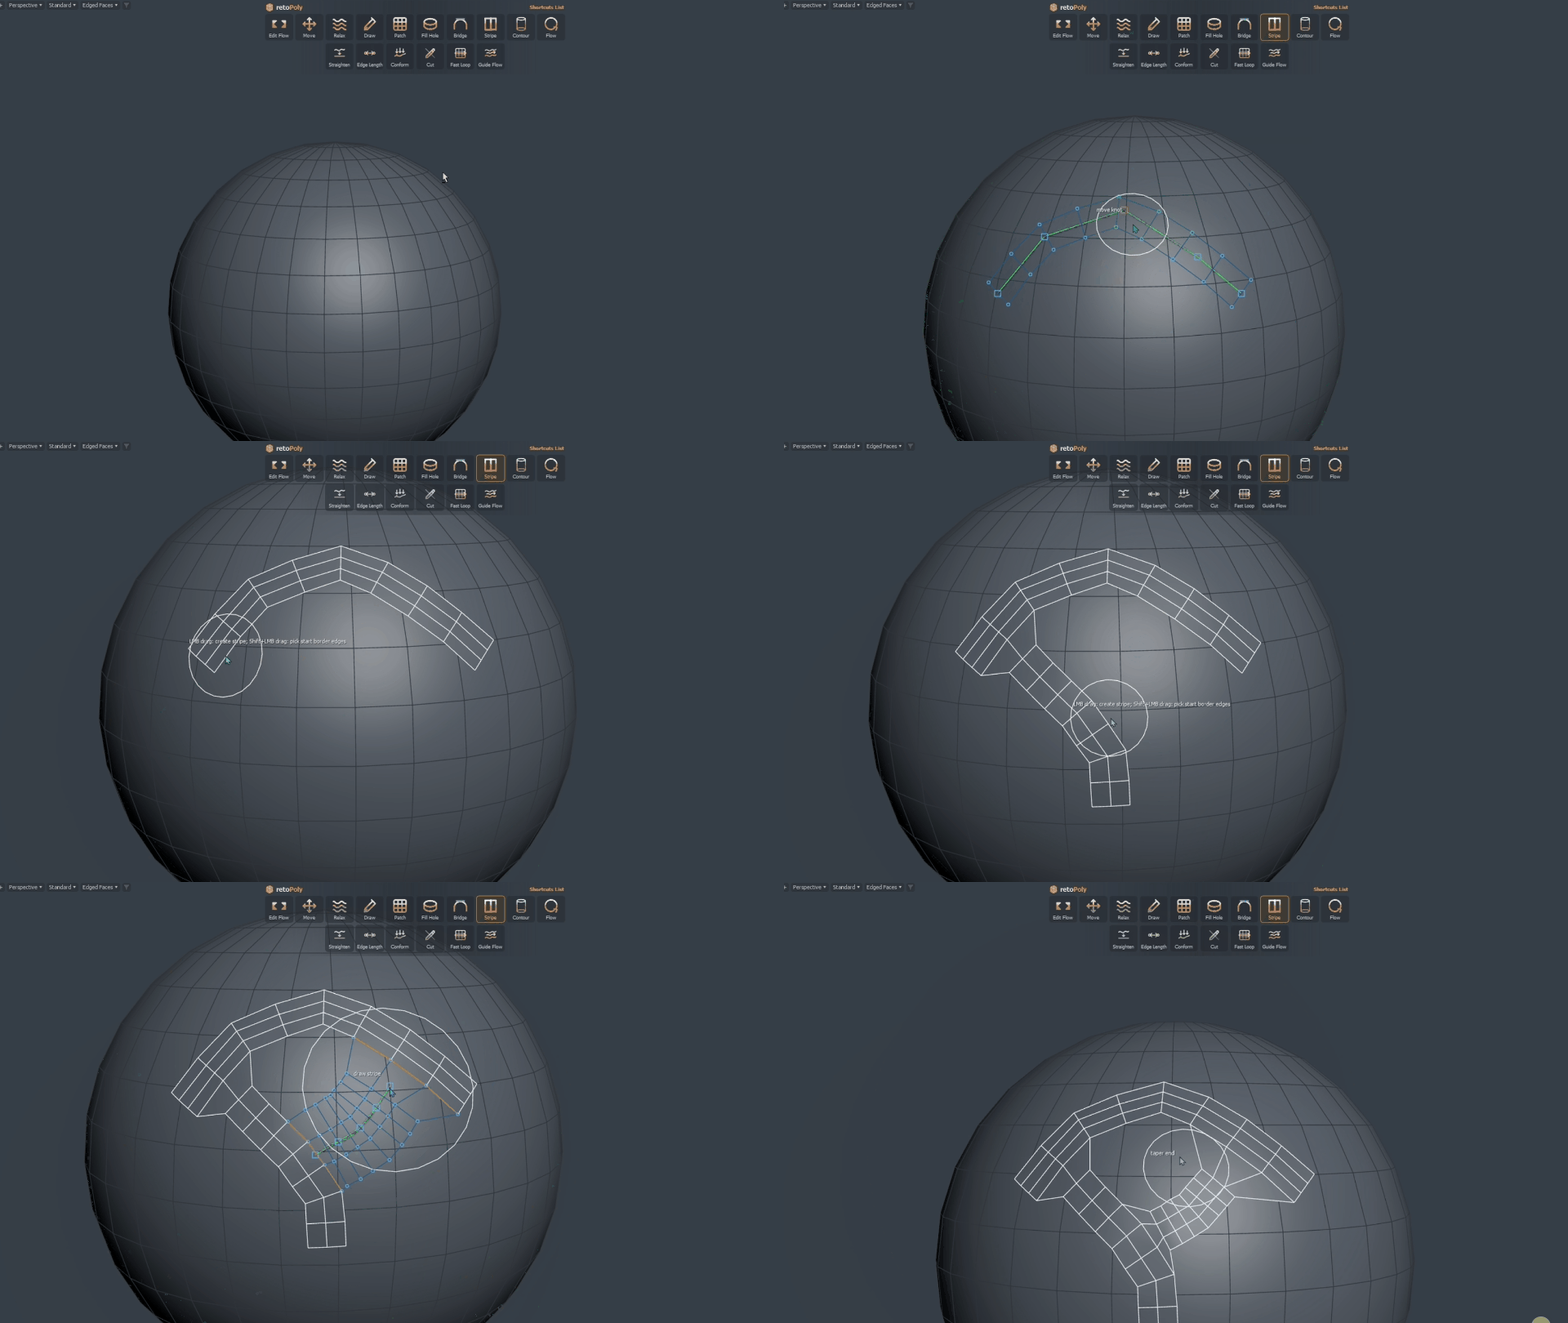
| Input | Action |
|---|---|
| LMB drag | Draw a stripe. Drag a visible knot to move it. |
| Shift + LMB drag | Paint the open border edges used as the welded stripe start. This does not change brush radius. |
| Ctrl + LMB drag | Adjust stripe knot count. |
| Ctrl + Alt + LMB drag | Adjust stripe length subdivisions. |
| Ctrl + Shift + LMB drag | Adjust stripe width segments. |
| Ctrl + Shift + Alt + LMB drag | Adjust brush radius / stripe half-width. |
| Alt + LMB drag on first / last knot | Taper the corresponding stripe end. |
| RMB | Commit the stripe. If only a start border is selected, first RMB clears that selection. |
Creates a projected grid patch from two drawn guides, optional border chains, or a corner-patch configuration with two editable curved guides.
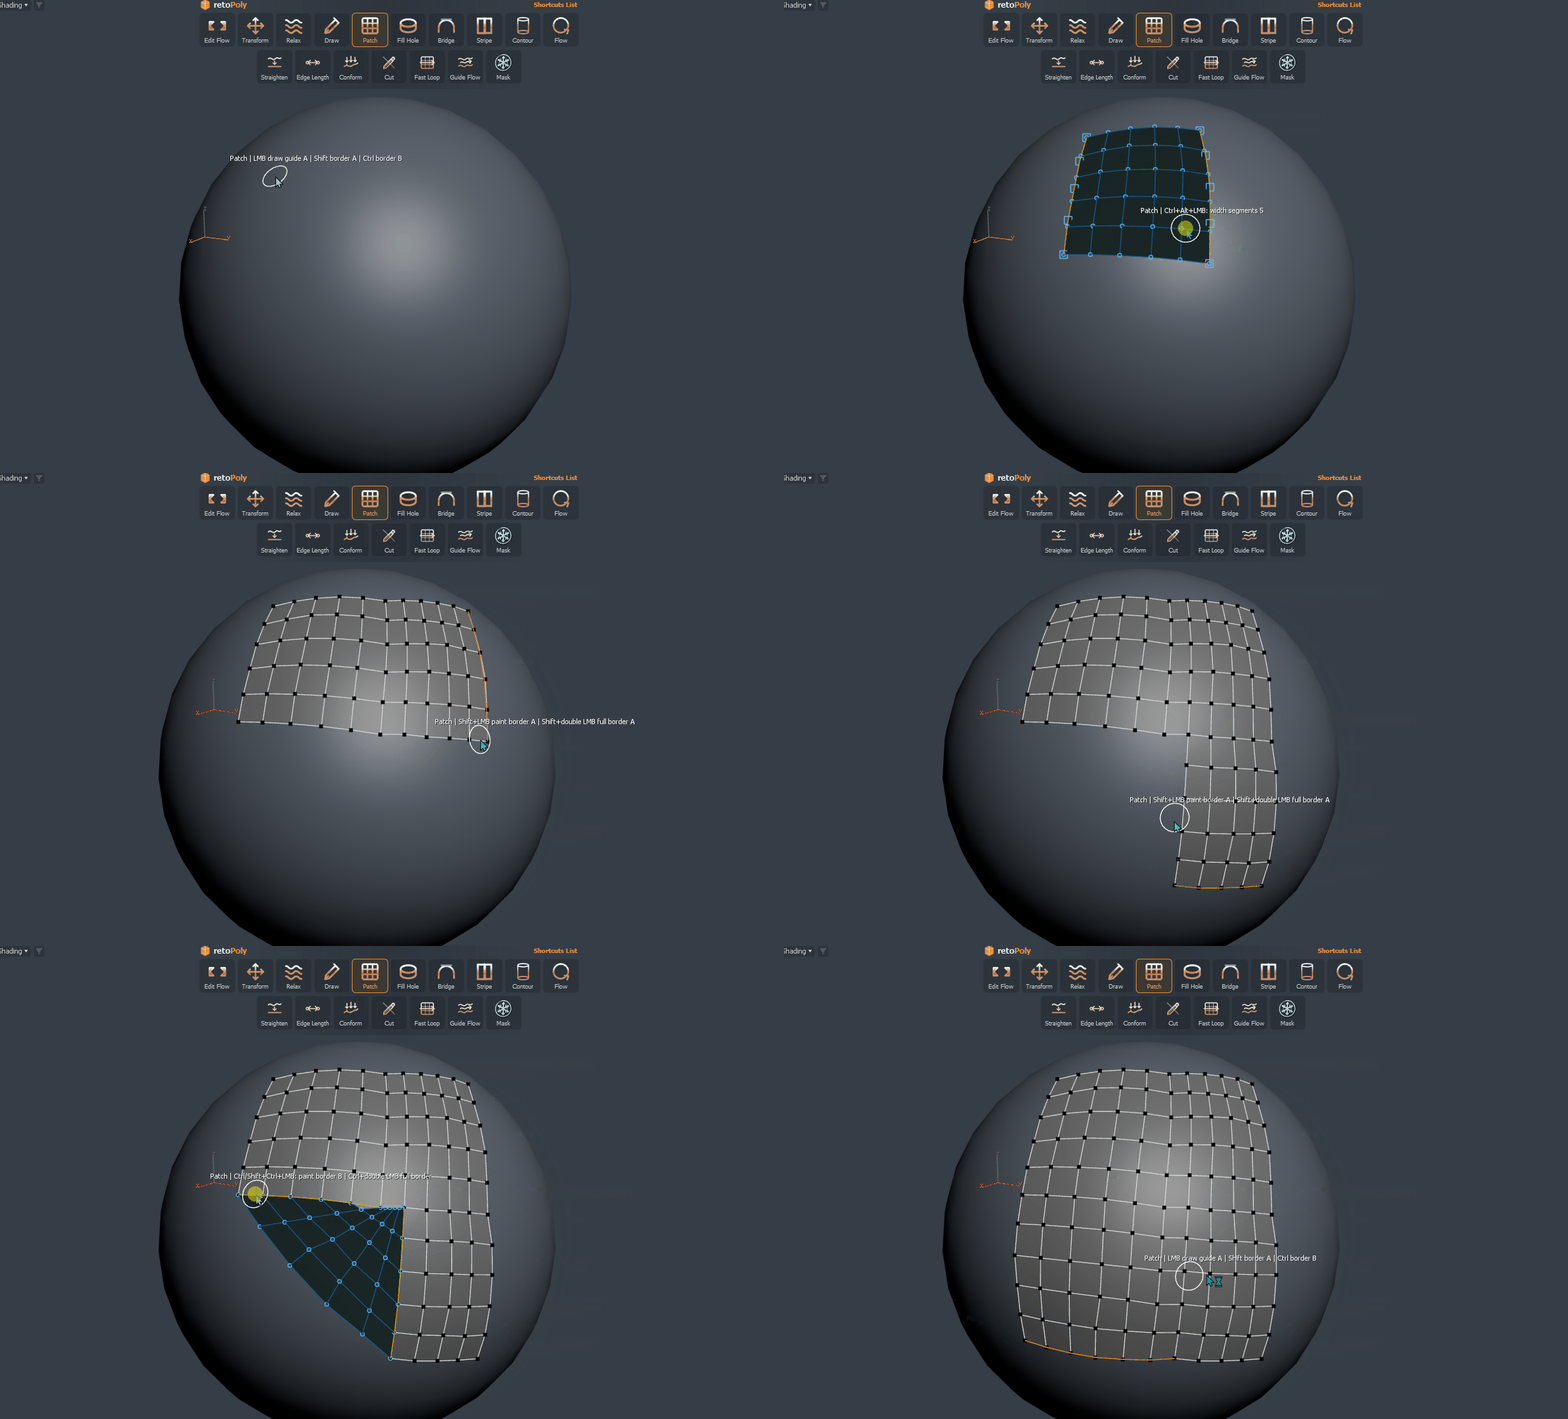
| Input | Action |
|---|---|
| LMB drag | Draw guide A or B. Drag a visible guide knot to move it. |
| Shift + LMB drag | Paint border A. |
| Shift + double LMB | Load the full open border as border A. |
| Ctrl + LMB drag on a guide knot | Adjust patch knot count. |
| Ctrl + LMB drag on border edges | Paint border B. |
| Ctrl + double LMB | Load the full open border as border B. |
| Ctrl + Shift + LMB drag | Paint border B. |
| Shift + Alt + LMB drag | Create / move the corner patch handle. |
| Alt + LMB drag | Adjust patch length segments. |
| Ctrl + Alt + LMB drag | Adjust patch width segments. |
| Ctrl + Shift + Alt + LMB drag | Adjust patch brush radius. |
| RMB | Commit the patch and continue. With no preview, exit. |
Draws projected quad rows from an open border and also supports reusable open/closed guides, perpendicular Ctrl extrusion strokes, guide segmentation and hole-border guides.
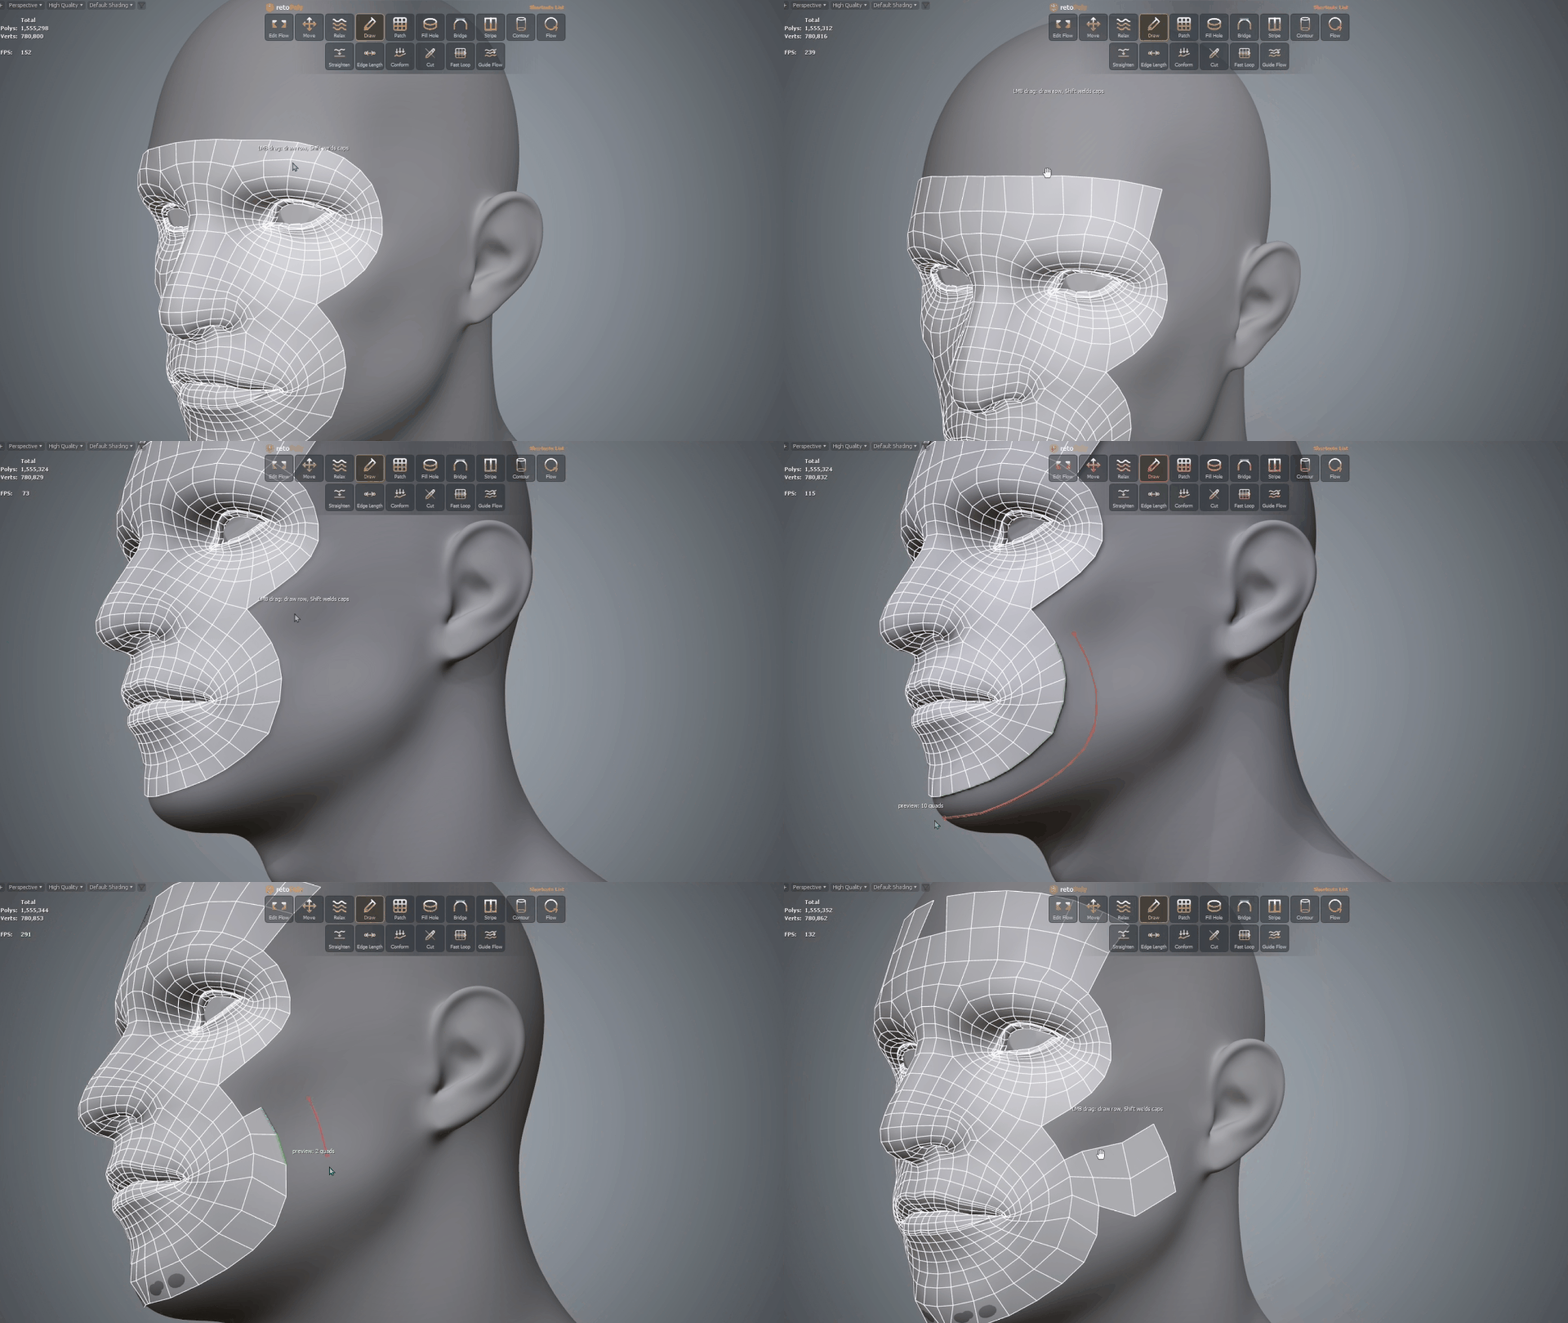
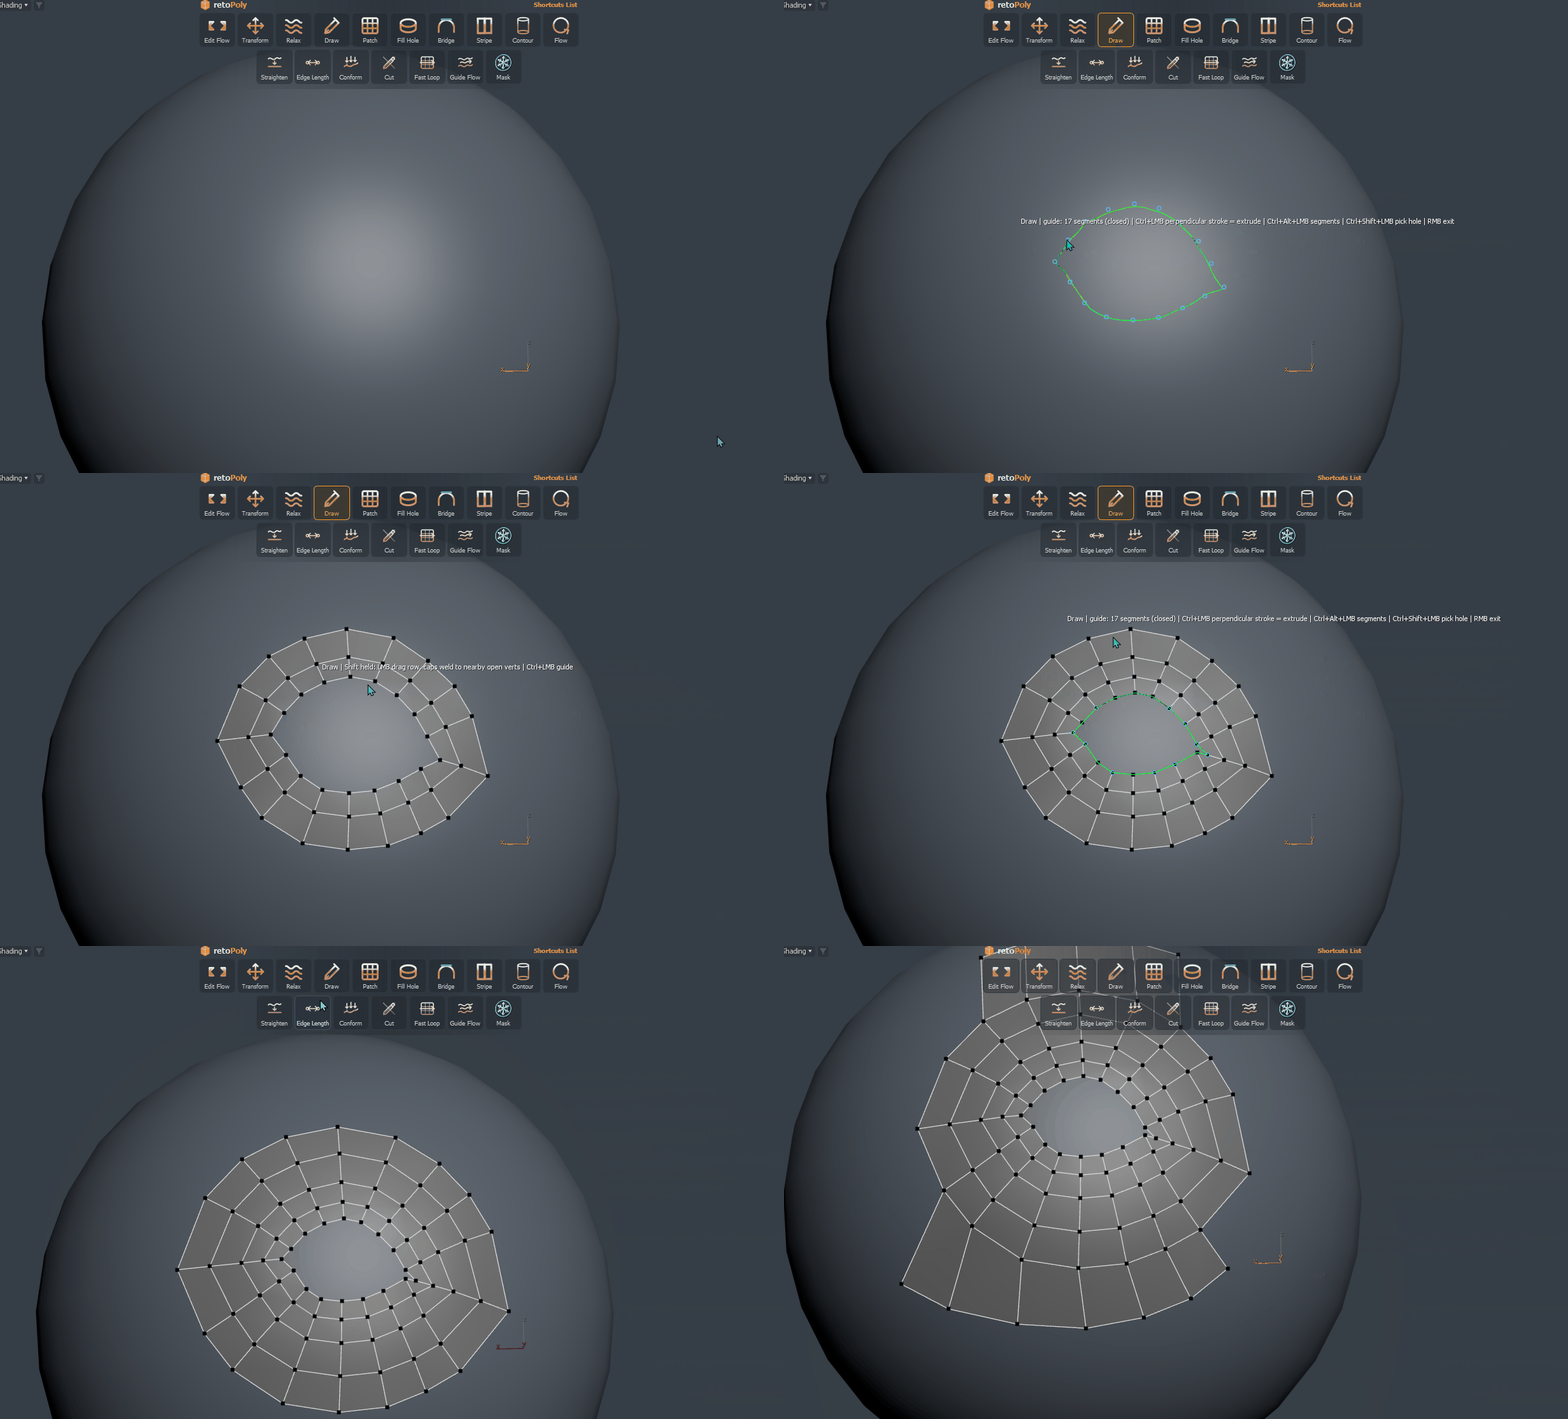
| Input | Action |
|---|---|
| LMB drag | Draw a retopology row from the detected open border; release commits it. The yellow/amber border preview shows the exact existing boundary span being used. |
| Ctrl + LMB drag (no guide) | Draw an open or closed temporary guide. A fresh open guide starts with one segment and no internal subdivisions. |
| Ctrl + LMB drag (guide exists) | Draw a short stroke perpendicular to the guide to set the next row height and direction. Release extrudes one row, and that new row becomes the guide for stroke 3, 4 and later rows. |
| Ctrl + Alt + LMB drag | Adjust free-guide segmentation horizontally, Bridge-style. Dragging changes the number of guide segments interactively. |
| Ctrl + Shift + LMB | Pick a closed hole border, using its real boundary vertices as the current closed guide. |
| Ctrl + LMB drag after hole pick | Drag inward or outward across the hole border to set ring height. Release creates a connected quad ring and advances the guide to the new ring. |
| LMB drag after a guide | Draw one row from the current guide and consume the guide after commit. |
| Hold Shift while releasing LMB | Weld row caps / ends when a valid nearby target is available. |
| Ctrl + Z after a guided row | The first Undo removes the created row and restores its guide; a second Undo removes the guide itself. |
| RMB | Exit the tool. |
Draws connected boundaries to create a live quad patch preview. Four sides define the patch, and an existing open border can automatically provide the final side.
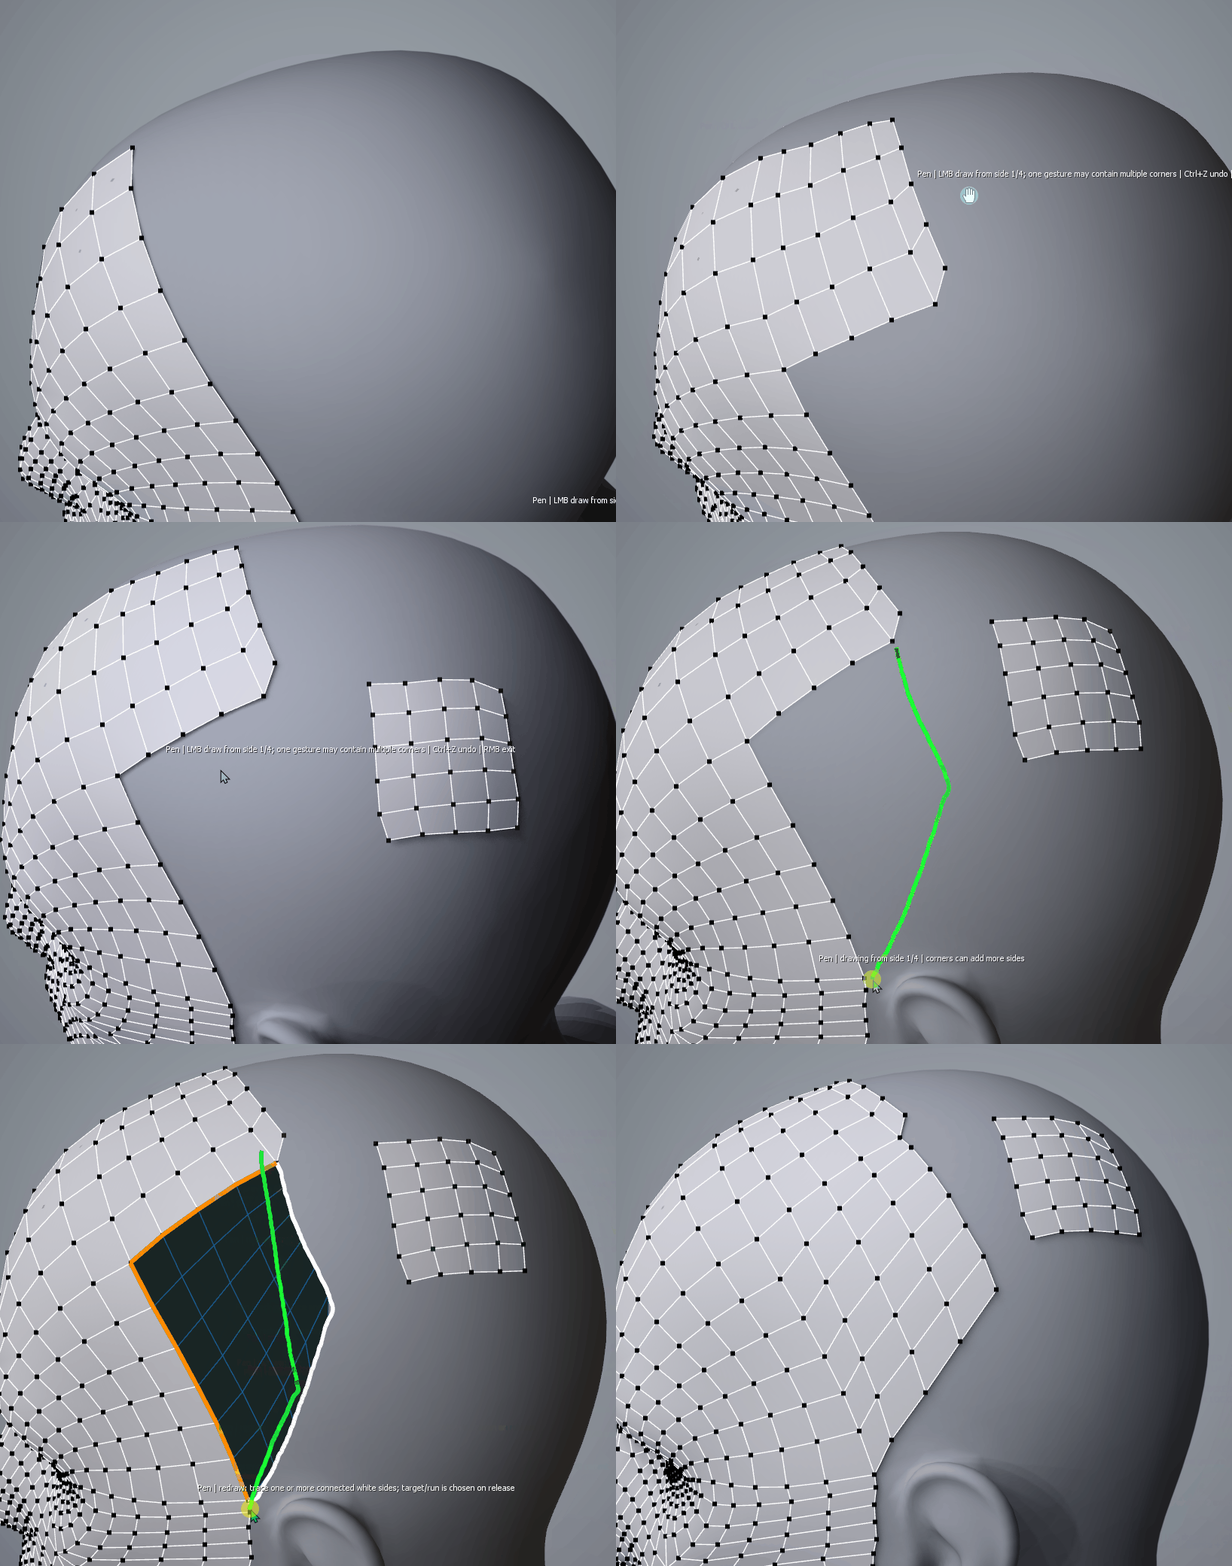
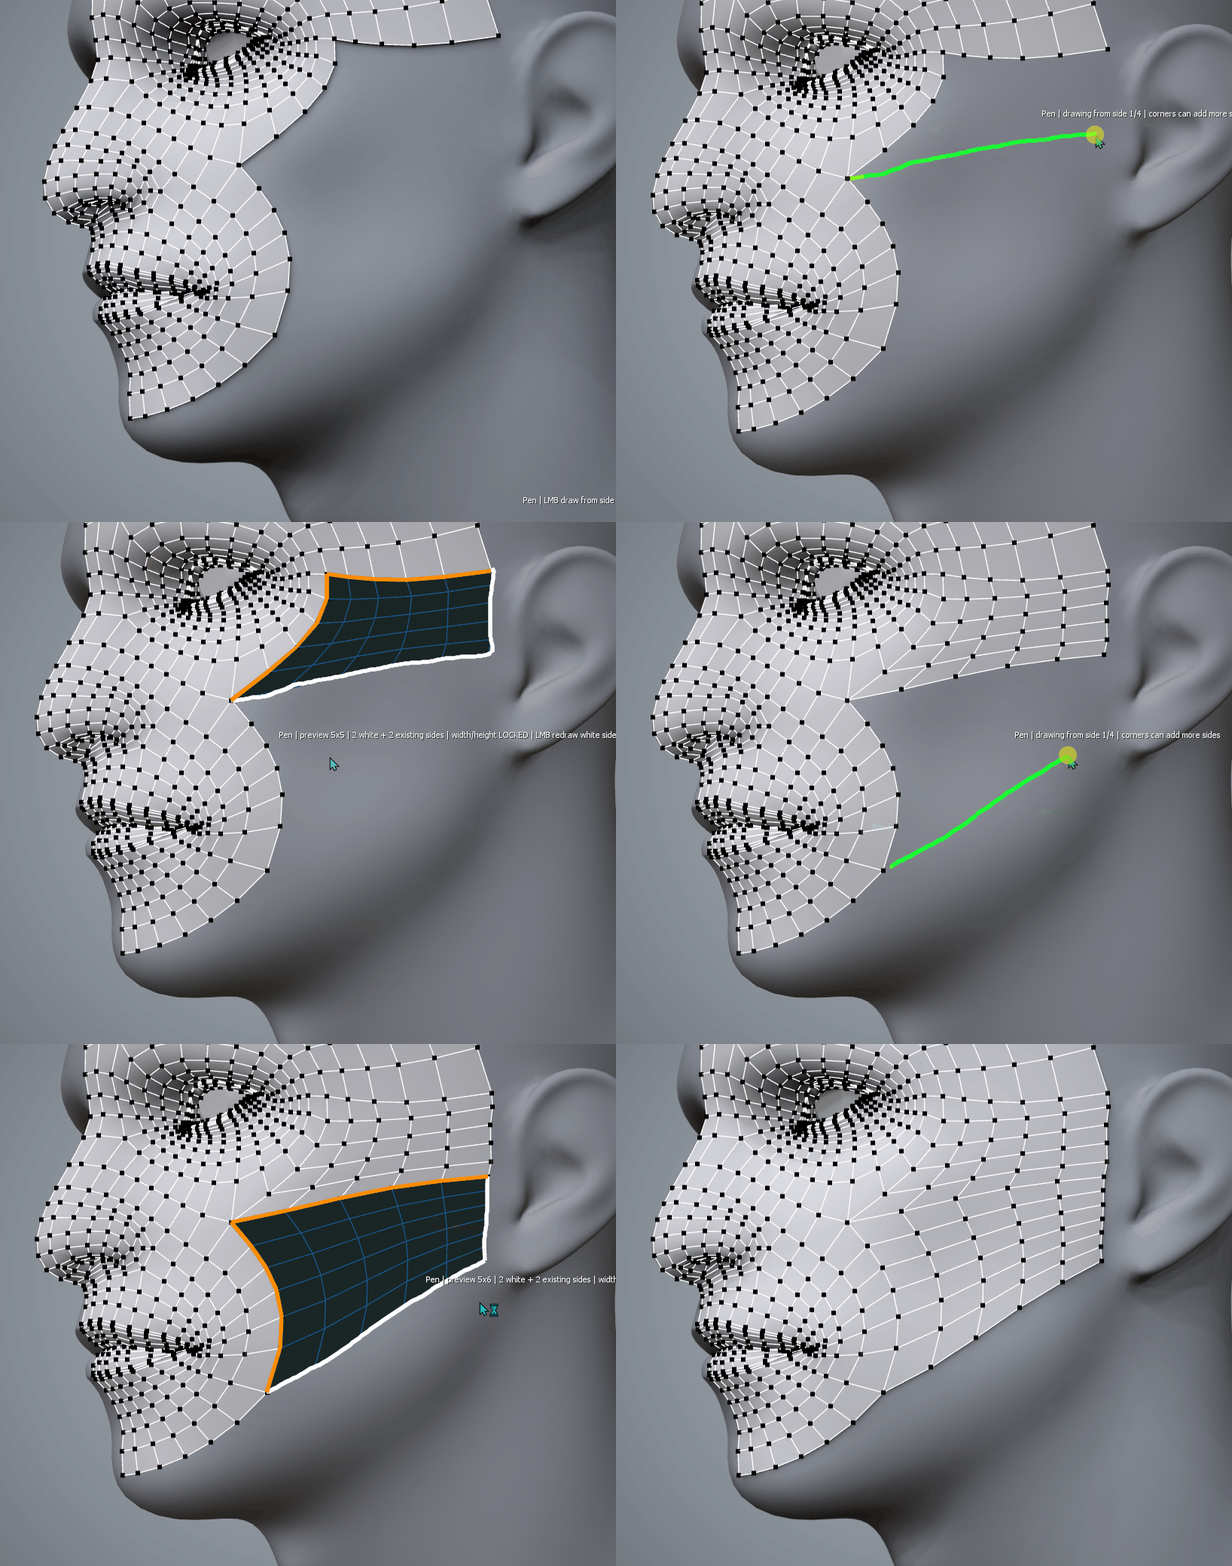
| Input | Action |
|---|---|
| LMB drag | Draw the next connected boundary. Four drawn sides create the live quad patch preview. |
| After side 3 | If the start of side 1 and end of side 3 are close to vertices on the same open border, that border becomes side 4 automatically. |
| LMB drag near an orange preview boundary | Redraw that free boundary. An existing-mesh side 4 is locked. |
| Ctrl + Z | Undo the last completed Pen stroke or redraw. |
| Alt + LMB drag | Adjust height segments. This is locked when height follows an existing border. |
| Ctrl + Alt + LMB drag | Adjust width segments. |
| RMB | Commit a valid preview and remain in Pen. With no preview, exit. |
A projected soft brush with four interaction modes: Move, Rotate, Scale and Relax. All modes operate on retopology vertices around the brush footprint.
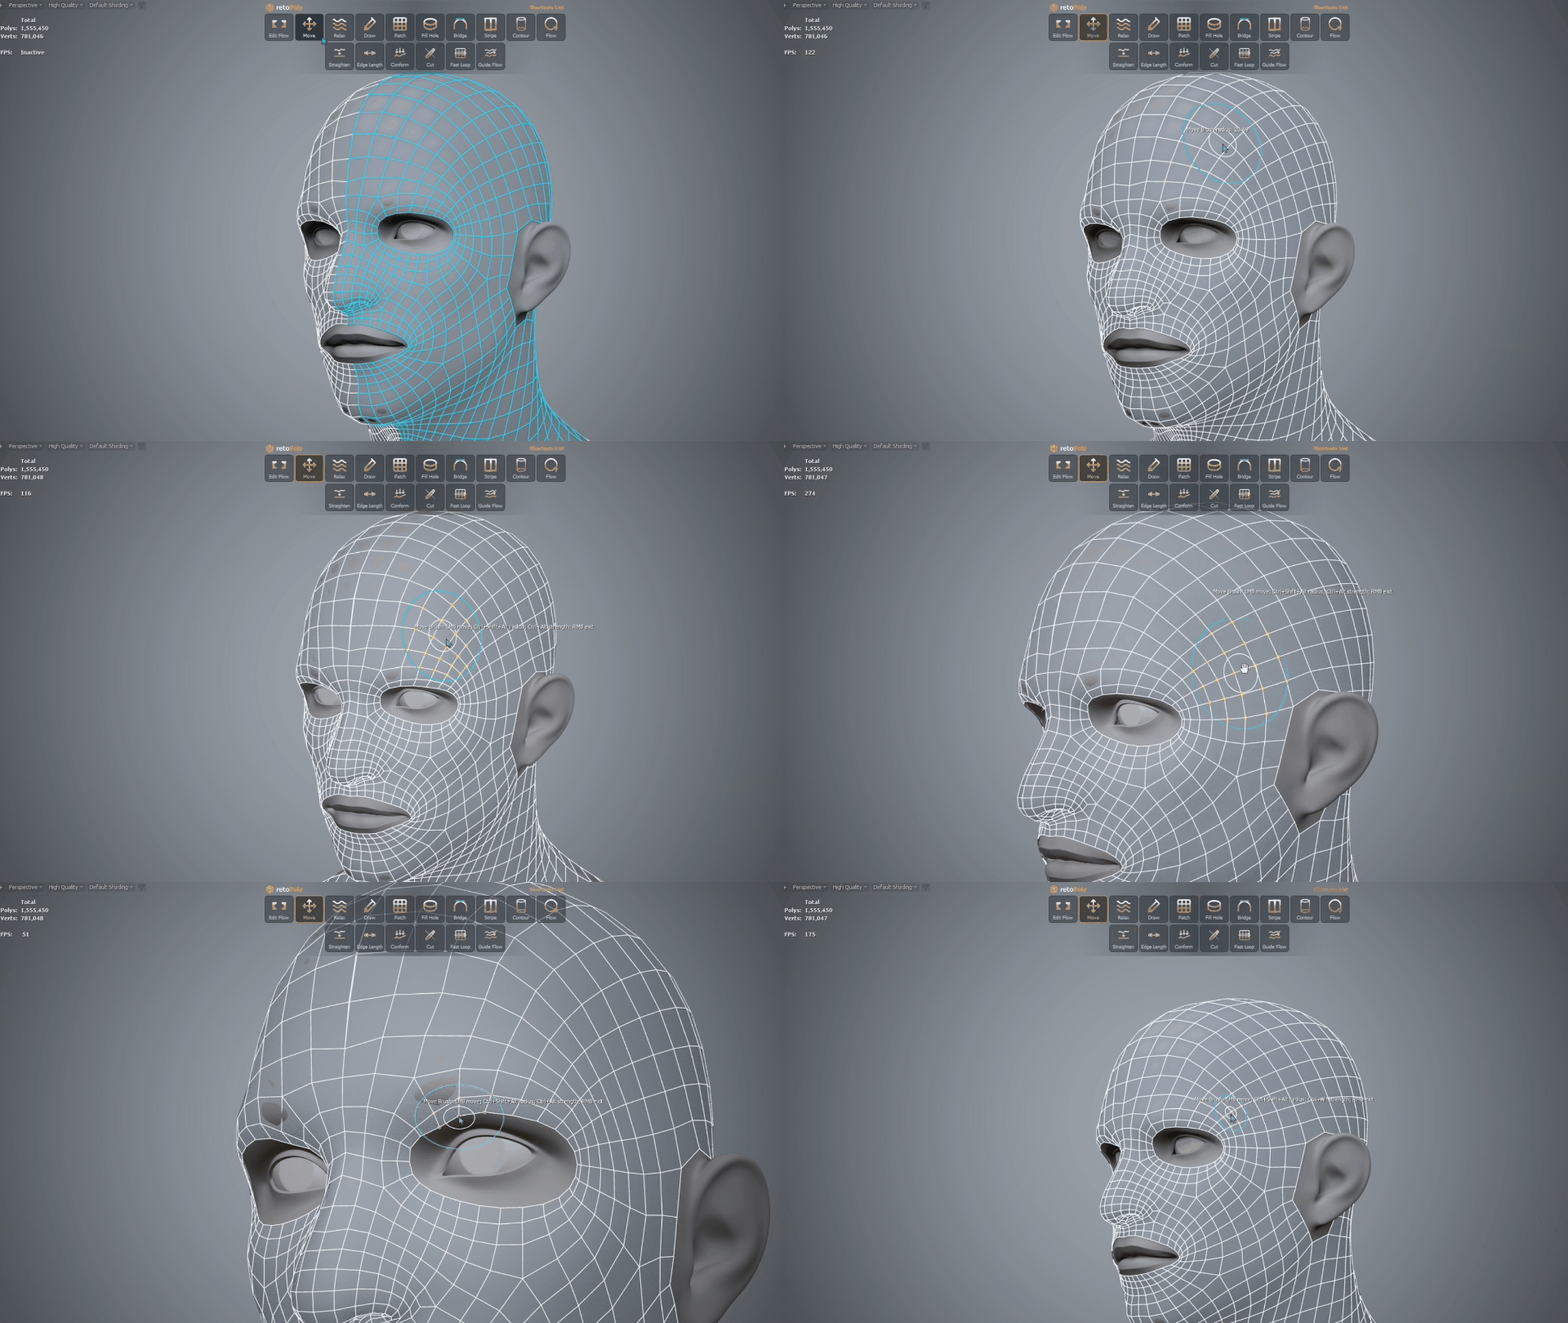
| Input | Action |
|---|---|
| LMB drag | Move: move retopology vertices under the brush while projecting to the High Poly. |
| Ctrl + LMB drag | Rotate: rotate affected vertices around the brush normal on the surface. |
| Alt + LMB drag | Scale: scale affected vertices in the brush tangent plane. |
| Shift + LMB drag | Relax: relax vertices under the brush while following the cursor. |
| Ctrl + Alt + LMB drag | Adjust Transform strength. |
| Ctrl + Shift + Alt + LMB drag | Adjust Transform brush radius. |
| RMB | Commit the current stroke and exit. |
Smooths vertex spacing under a soft brush, with modes for selections, borders, projection, radius and strength.
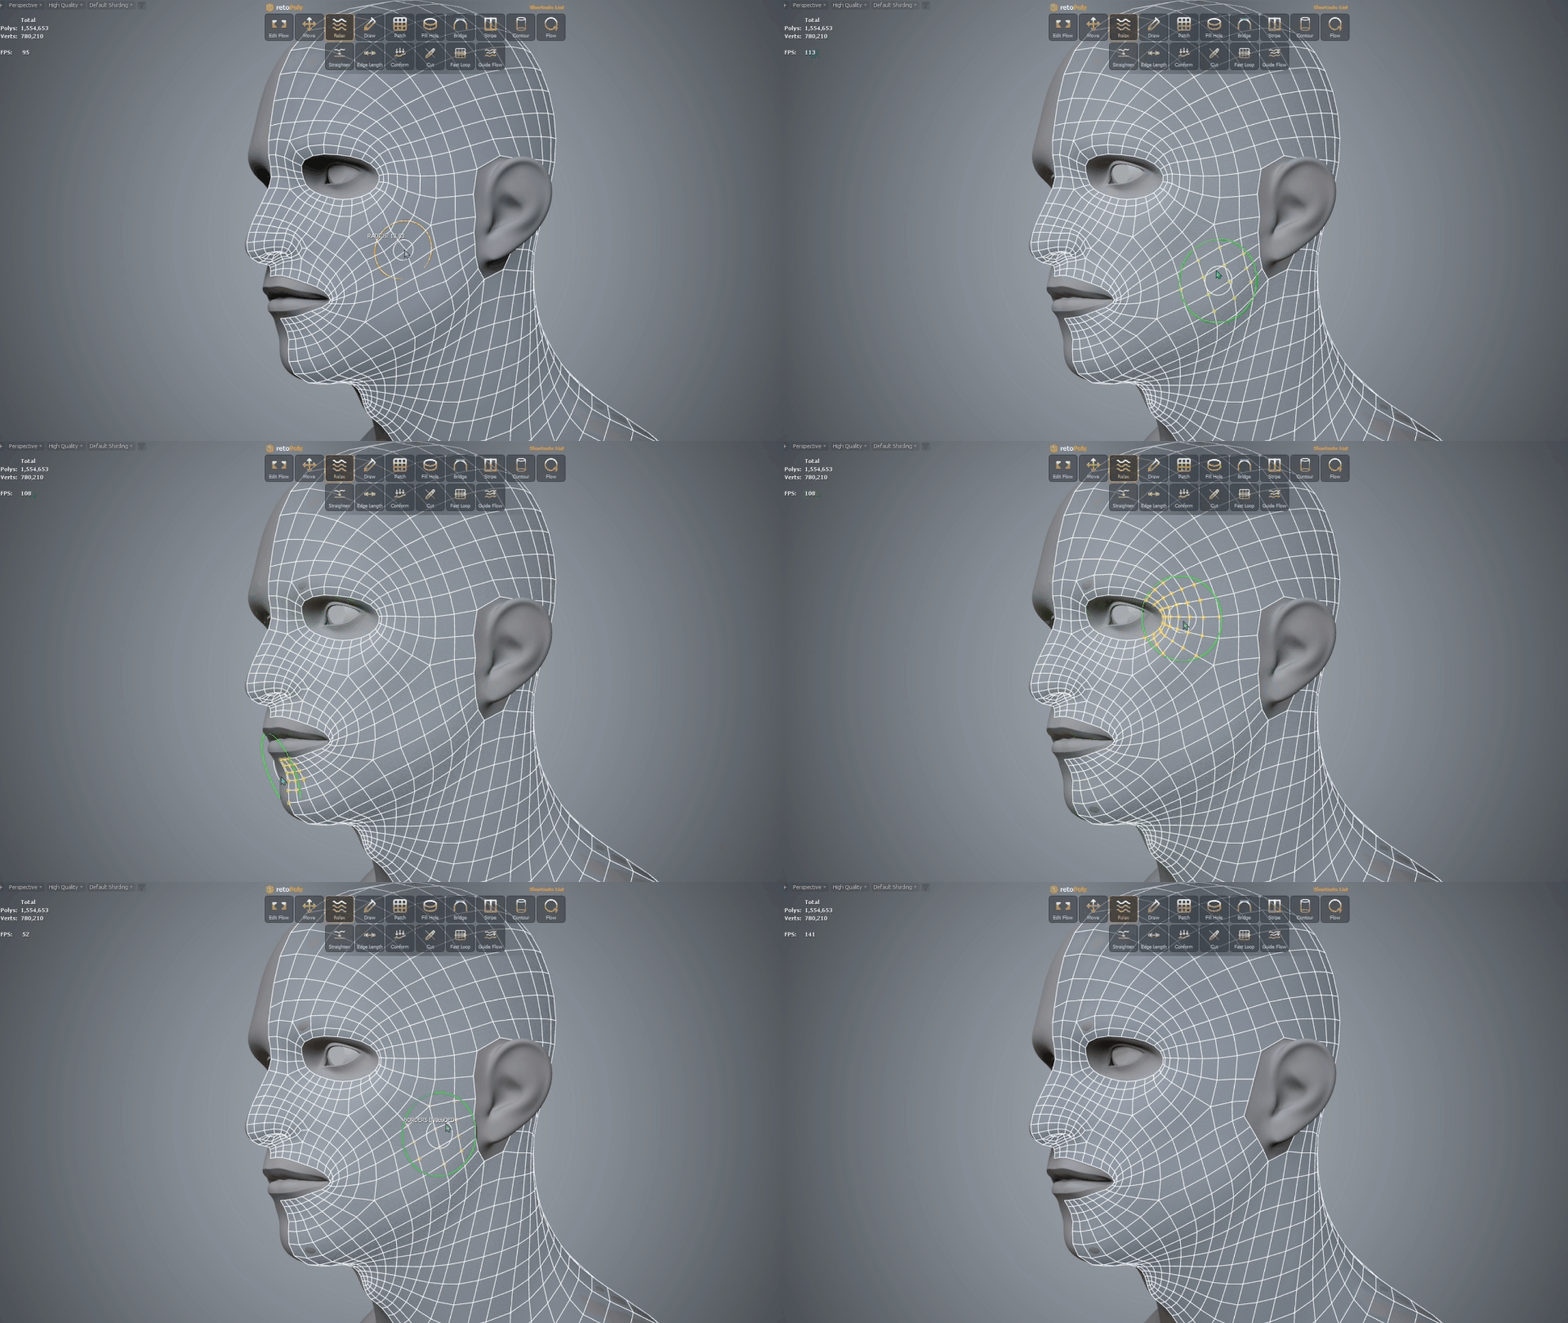
| Input | Action |
|---|---|
| LMB drag | Relax vertices under the brush. |
| Shift + LMB drag | Relax selected vertices only. |
| Ctrl + LMB drag | Relax while including border vertices. |
| Alt + LMB drag | Slide open or smoothing-group borders along their boundary. |
| Ctrl + Shift + LMB drag | Project the affected area back to the high poly. |
| Ctrl + Alt + LMB drag | Adjust Relax strength. |
| Ctrl + Shift + Alt + LMB drag | Adjust Relax brush radius. |
| RMB | Commit the current stroke and exit. |
Rebuilds the quad region touched by a brush stroke as a projected rail grid aligned to the stroke.
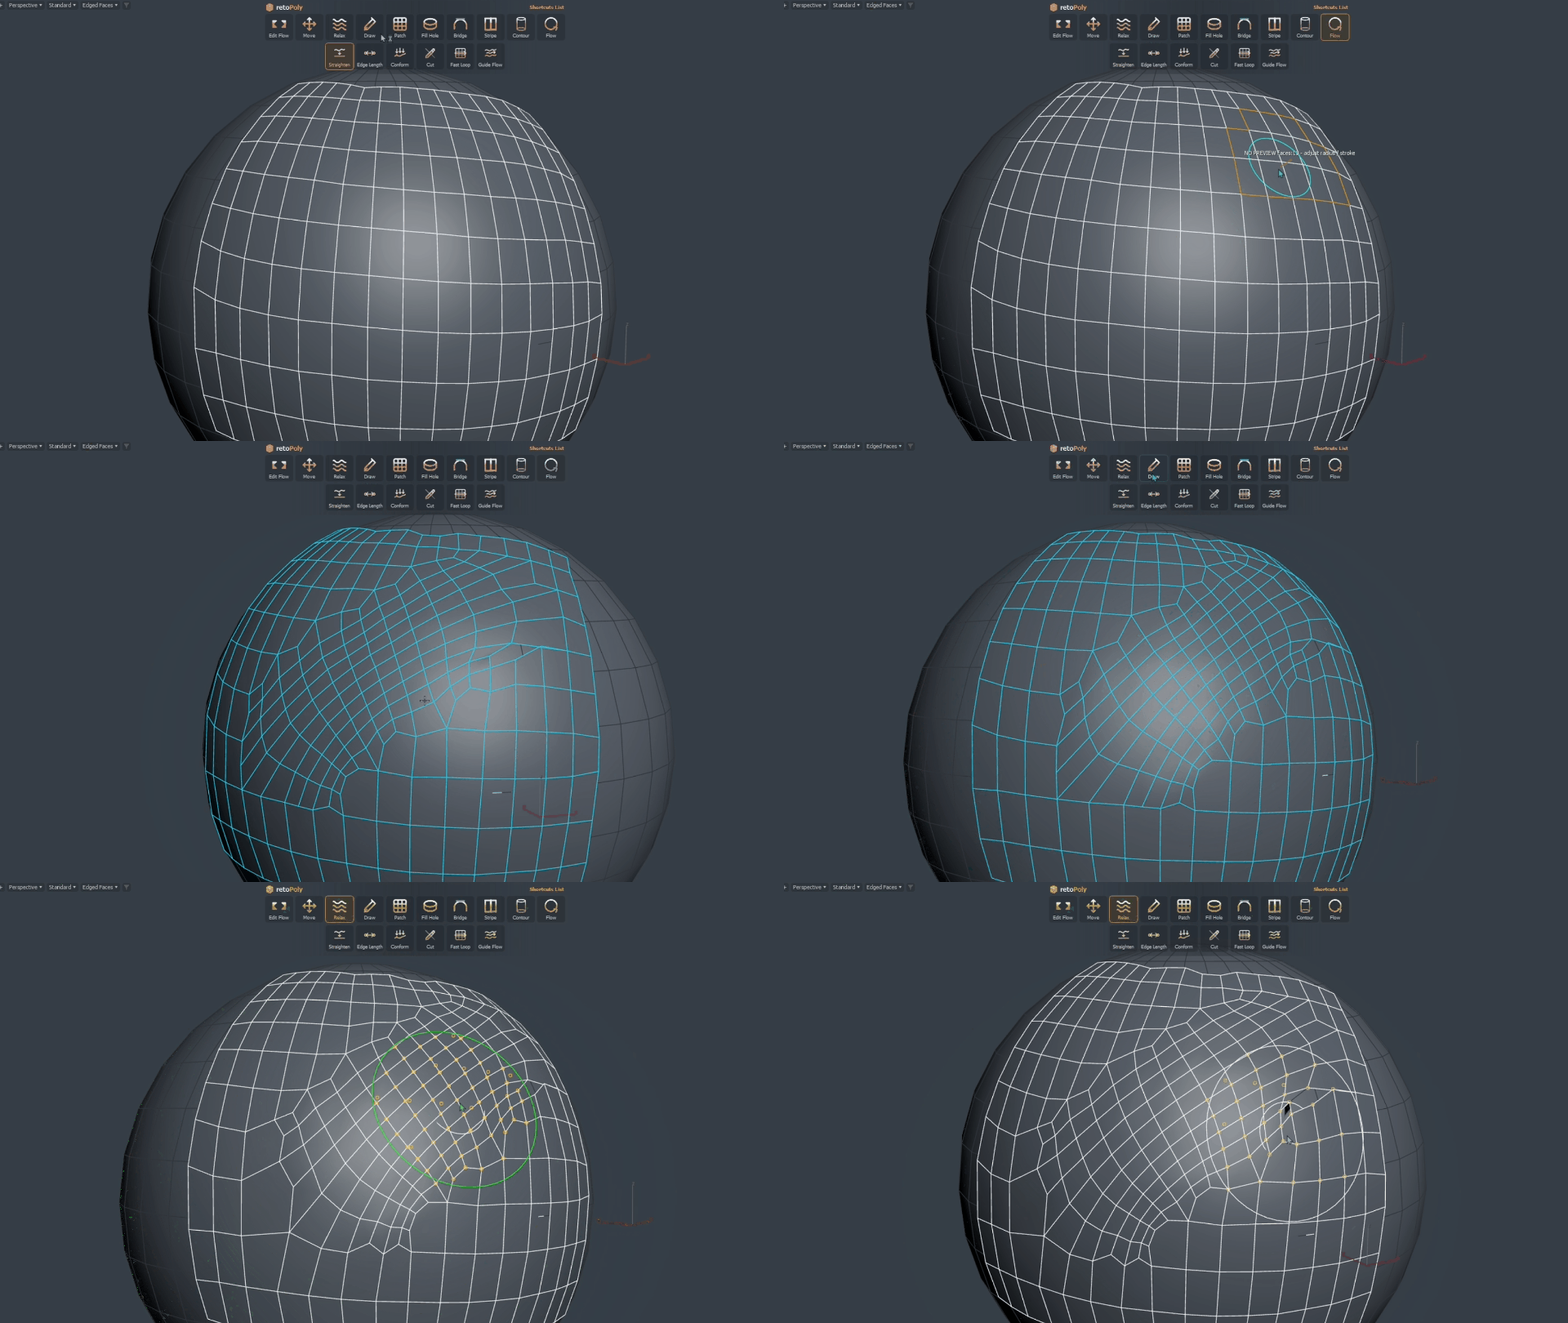
| Input | Action |
|---|---|
| LMB stroke | Draw the flow stroke. Releasing LMB commits the rebuilt flow grid and exits. |
| Ctrl + Shift + Alt + LMB drag | Adjust Flow radius / generated stripe width. |
| RMB | Cancel and exit. |
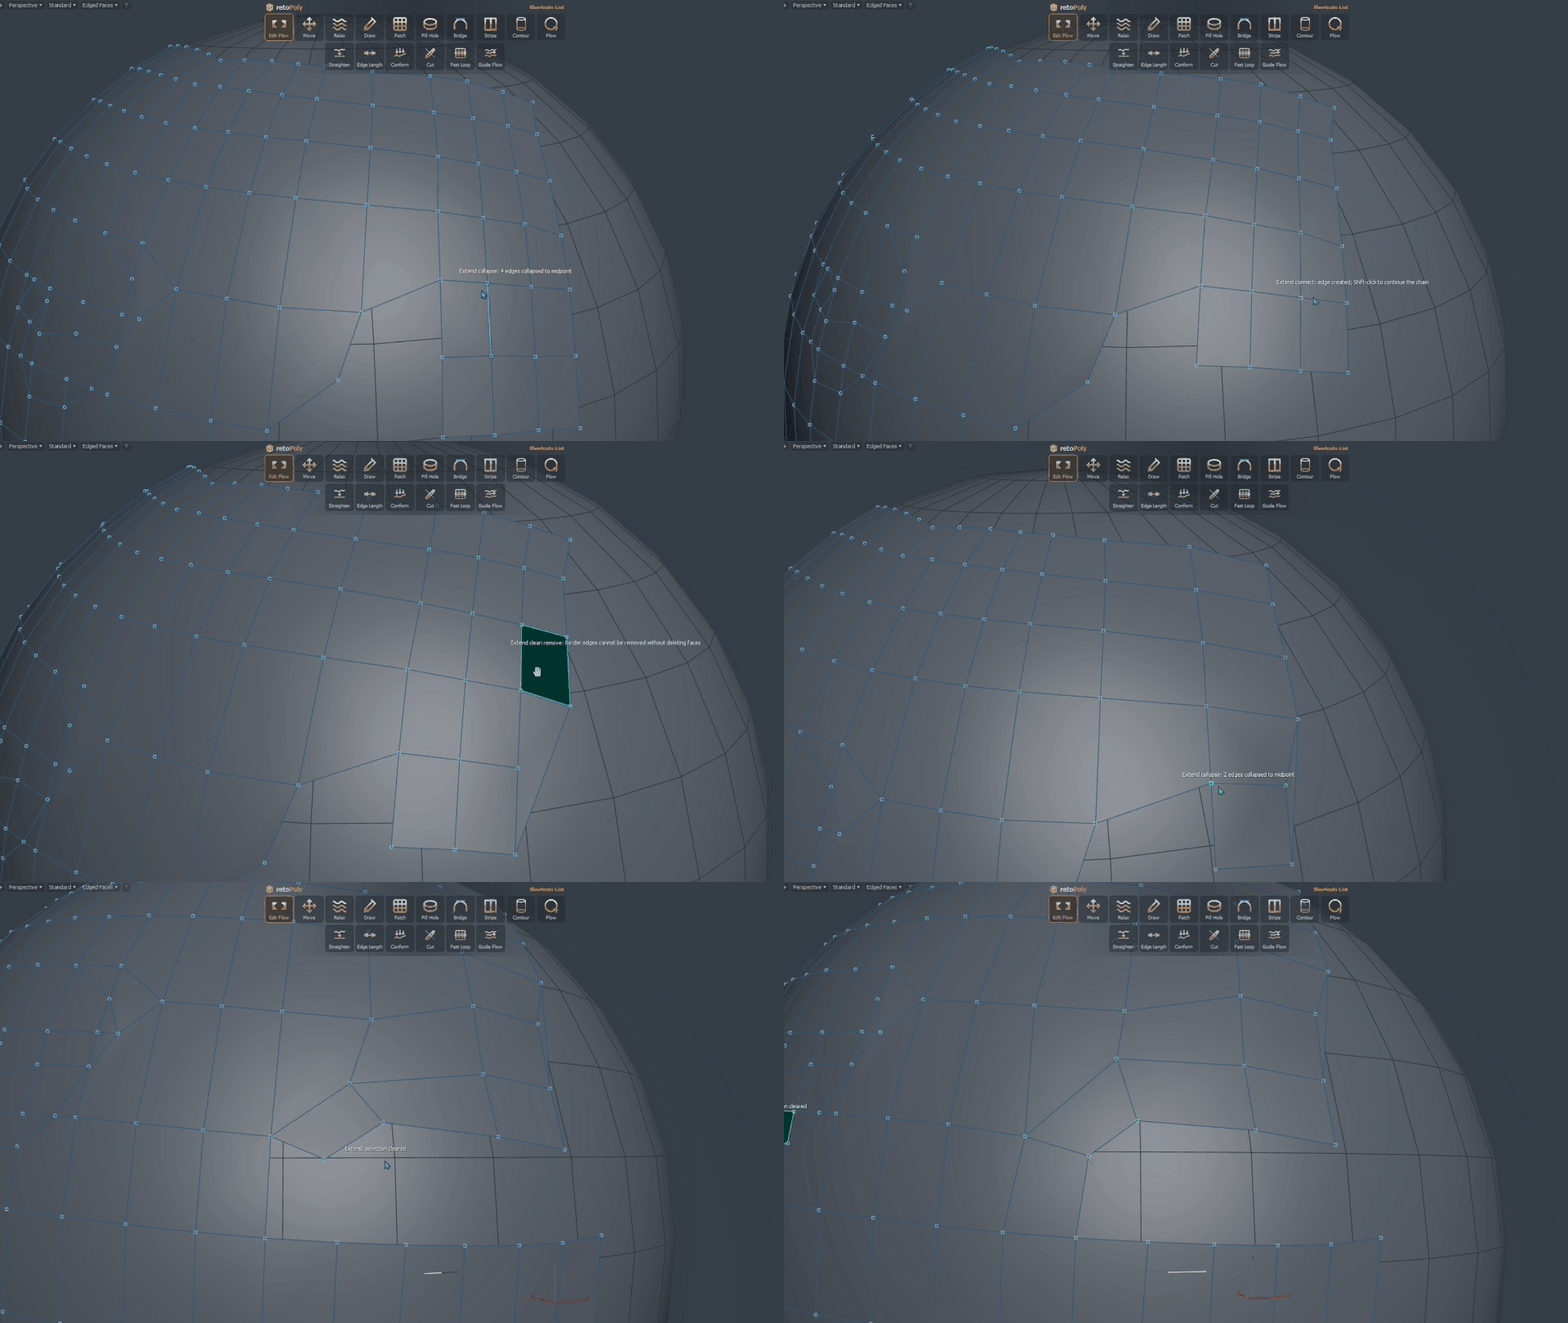
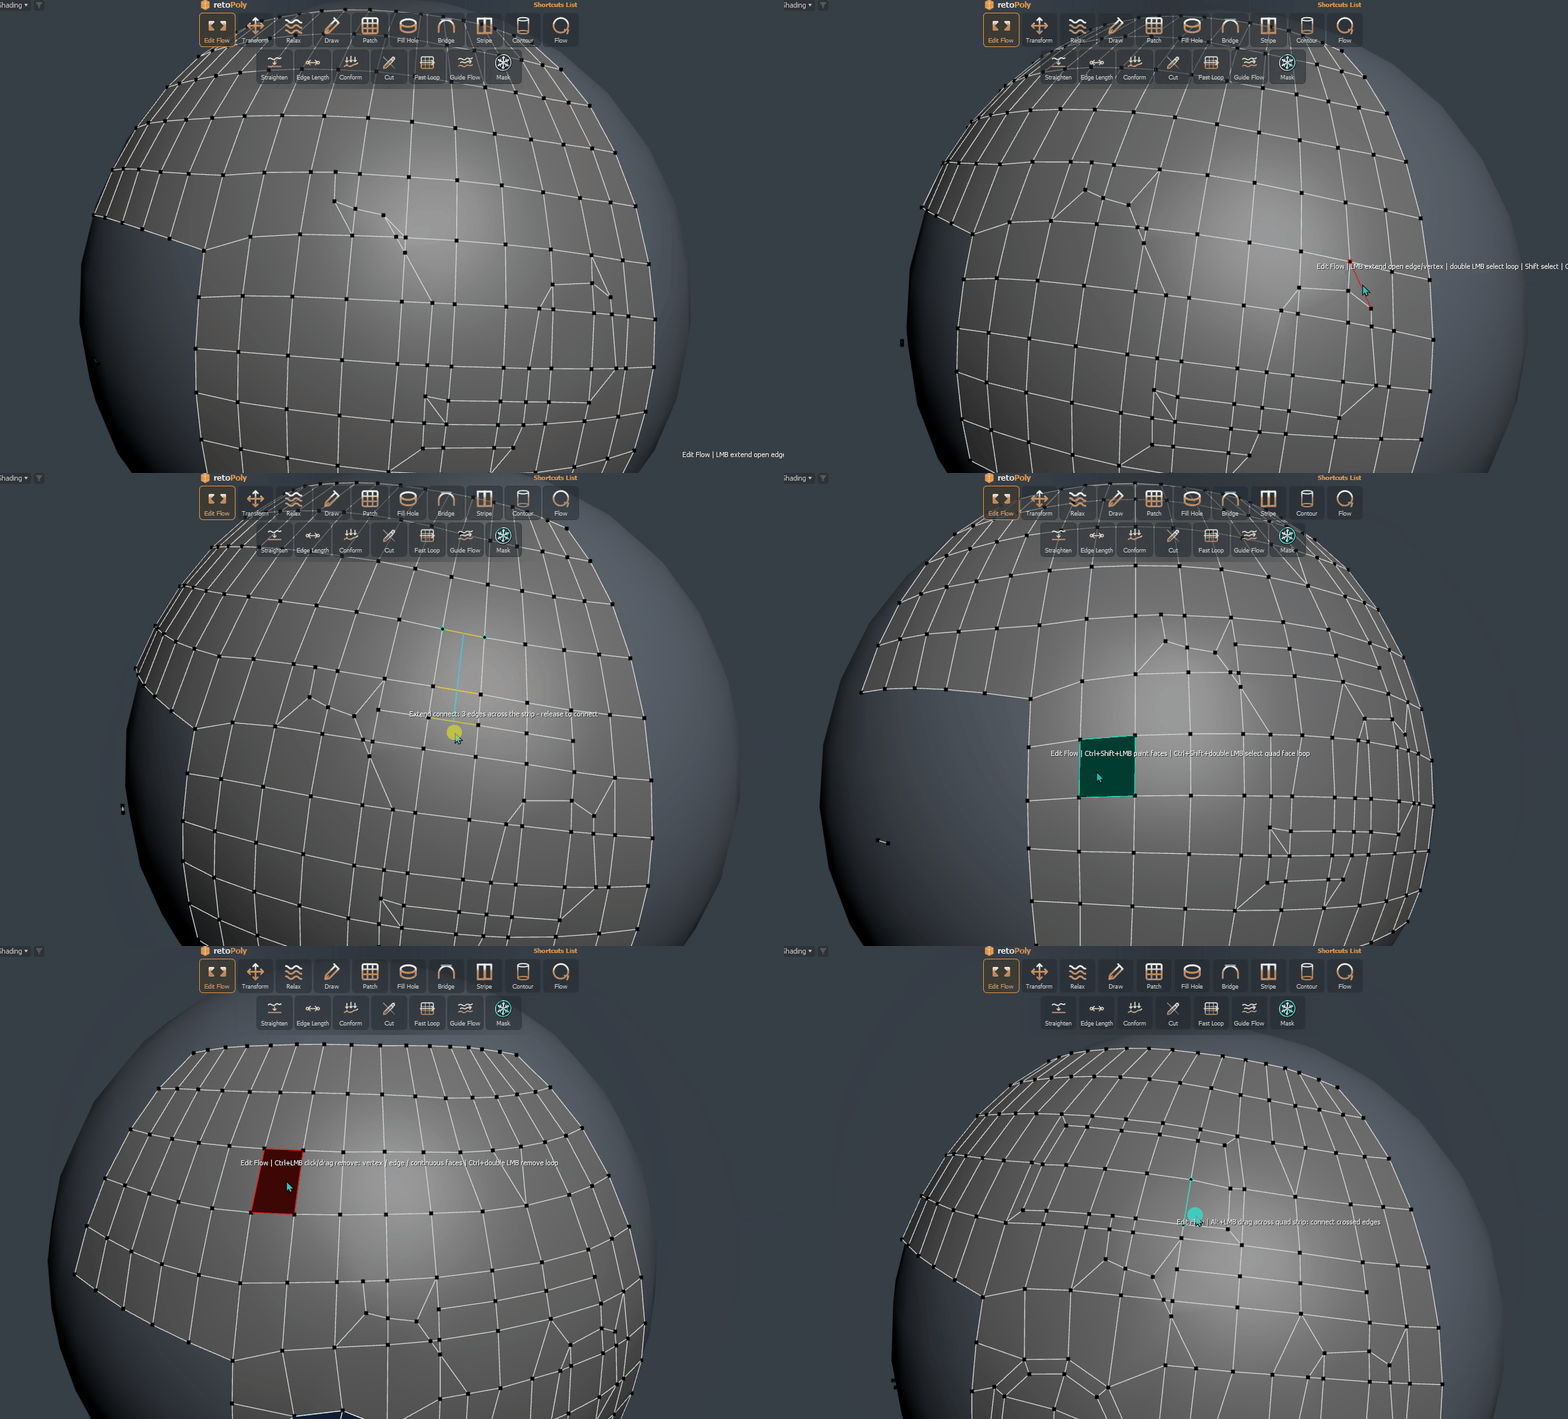
A multi-purpose topology editor for precise edge/face selection, open-border extension, bridging, connect/inset/circle operations, vertex movement, edge collapse and clean removal.
| Input | Action |
|---|---|
| LMB drag from an open edge | Extend the selected / connected open edge chain with quads. |
| Hold Shift during open-edge extend | Proximity-weld newly created vertices to nearby border vertices when the extend is committed. |
| LMB drag from an open vertex | Create a new face from that border vertex / corner. |
| Shift + LMB drag | Paint edges into the current selection. The paint follows the actual mouse stroke instead of auto-completing the complete border. |
| Shift + Alt + LMB drag | Remove edges and faces from the current selection. |
| Shift + LMB click on vertices | Connect vertices inside the same polygon and continue the connect chain. |
| Double LMB on an edge | Replace the edge selection with that edge loop / border loop. |
| Shift + double LMB on an edge | Add that edge loop / border loop to the selection. |
| Shift + Alt + double LMB on an edge | Remove that edge loop / border loop from the selection. |
| Ctrl + LMB | Remove the hovered vertex first; otherwise clean-remove edge(s), otherwise delete the face body. |
| Ctrl + double LMB on an edge | Clean-remove the entire hovered / selected edge loop. |
| Ctrl + Alt + double LMB on a selected quad face | Circle: circularize the boundary loop(s) of the selected quad region. |
| Ctrl + Shift + LMB drag from an open edge | Bridge the source open edge to another open edge. |
| Ctrl + Shift + LMB drag elsewhere | Paint faces into the face selection. |
| Ctrl + Shift + double LMB on a face | Select the connected quad face loop. |
| Alt + LMB drag with selected faces | Inset the current face selection. |
| Alt + LMB drag without selected faces | Connect crossed edges through the quad strip. |
| Ctrl + Alt + LMB drag | Paint independent edges and collapse them to their midpoints on release. |
| Ctrl + Shift + Alt + LMB drag | Move any unfrozen retopology vertex over the High Poly surface. |
| Click on High Poly / empty retopo area | Clear the current component selection. |
| RMB | Commit any active drag and exit. |
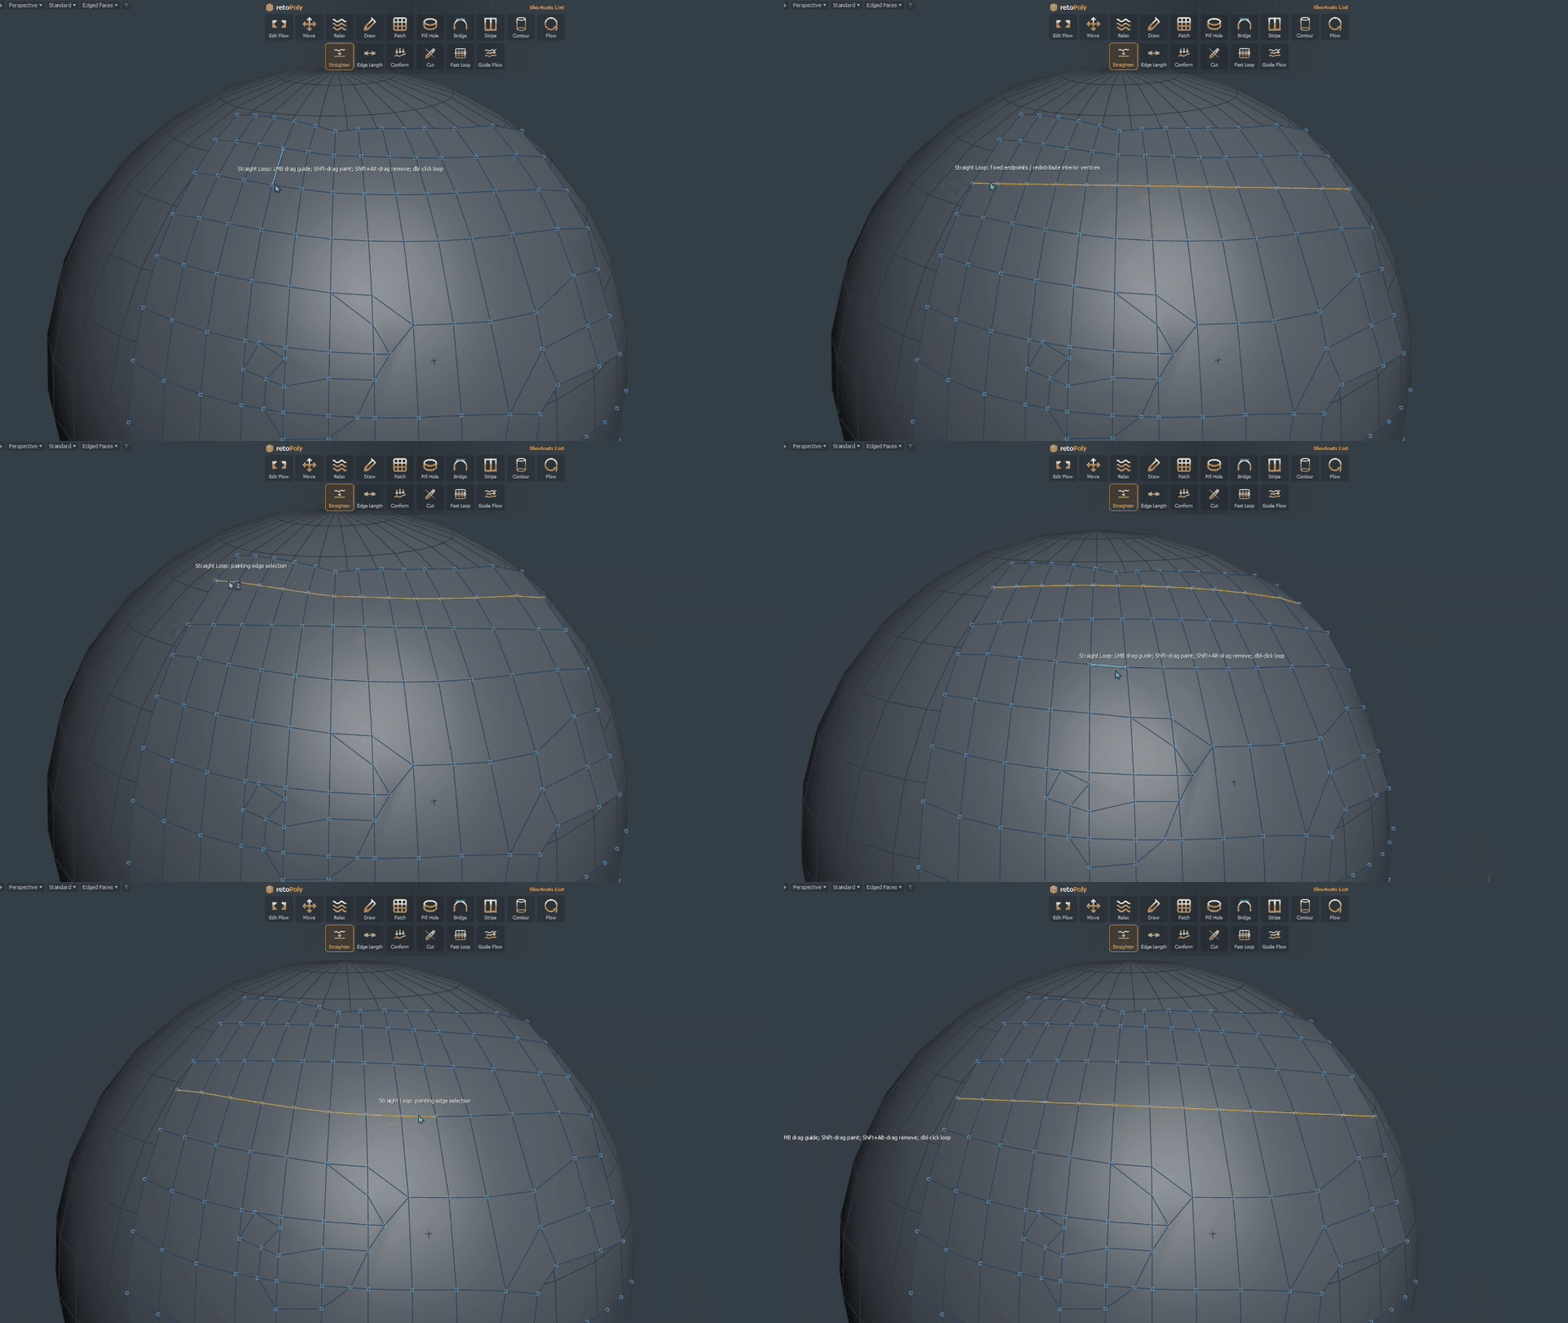
Straightens one or more selected, non-branching edge chains to a screen-drawn guide while preserving projection to the High Poly.
| Input | Action |
|---|---|
| LMB click on an edge | Seed the explicit straighten edge selection when it is empty. |
| Shift + LMB drag | Add edges to the explicit straighten selection. |
| Shift + Alt + LMB drag | Remove edges from the explicit straighten selection. |
| Double LMB on an edge | Replace the selection with that edge loop / border loop. |
| Shift + double LMB | Add that edge loop / border loop. |
| Shift + Alt + double LMB | Remove that edge loop / border loop. |
| LMB drag with a selected chain | Draw the guide and slide selected vertices onto it. |
| Ctrl + LMB drag with a selected chain | Straighten along the guide while preserving original edge lengths. |
| Alt + LMB drag with a selected chain | Keep endpoints fixed and redistribute interior vertices. |
| RMB | Cancel the unfinished guide, clear the temporary selection, and exit. |
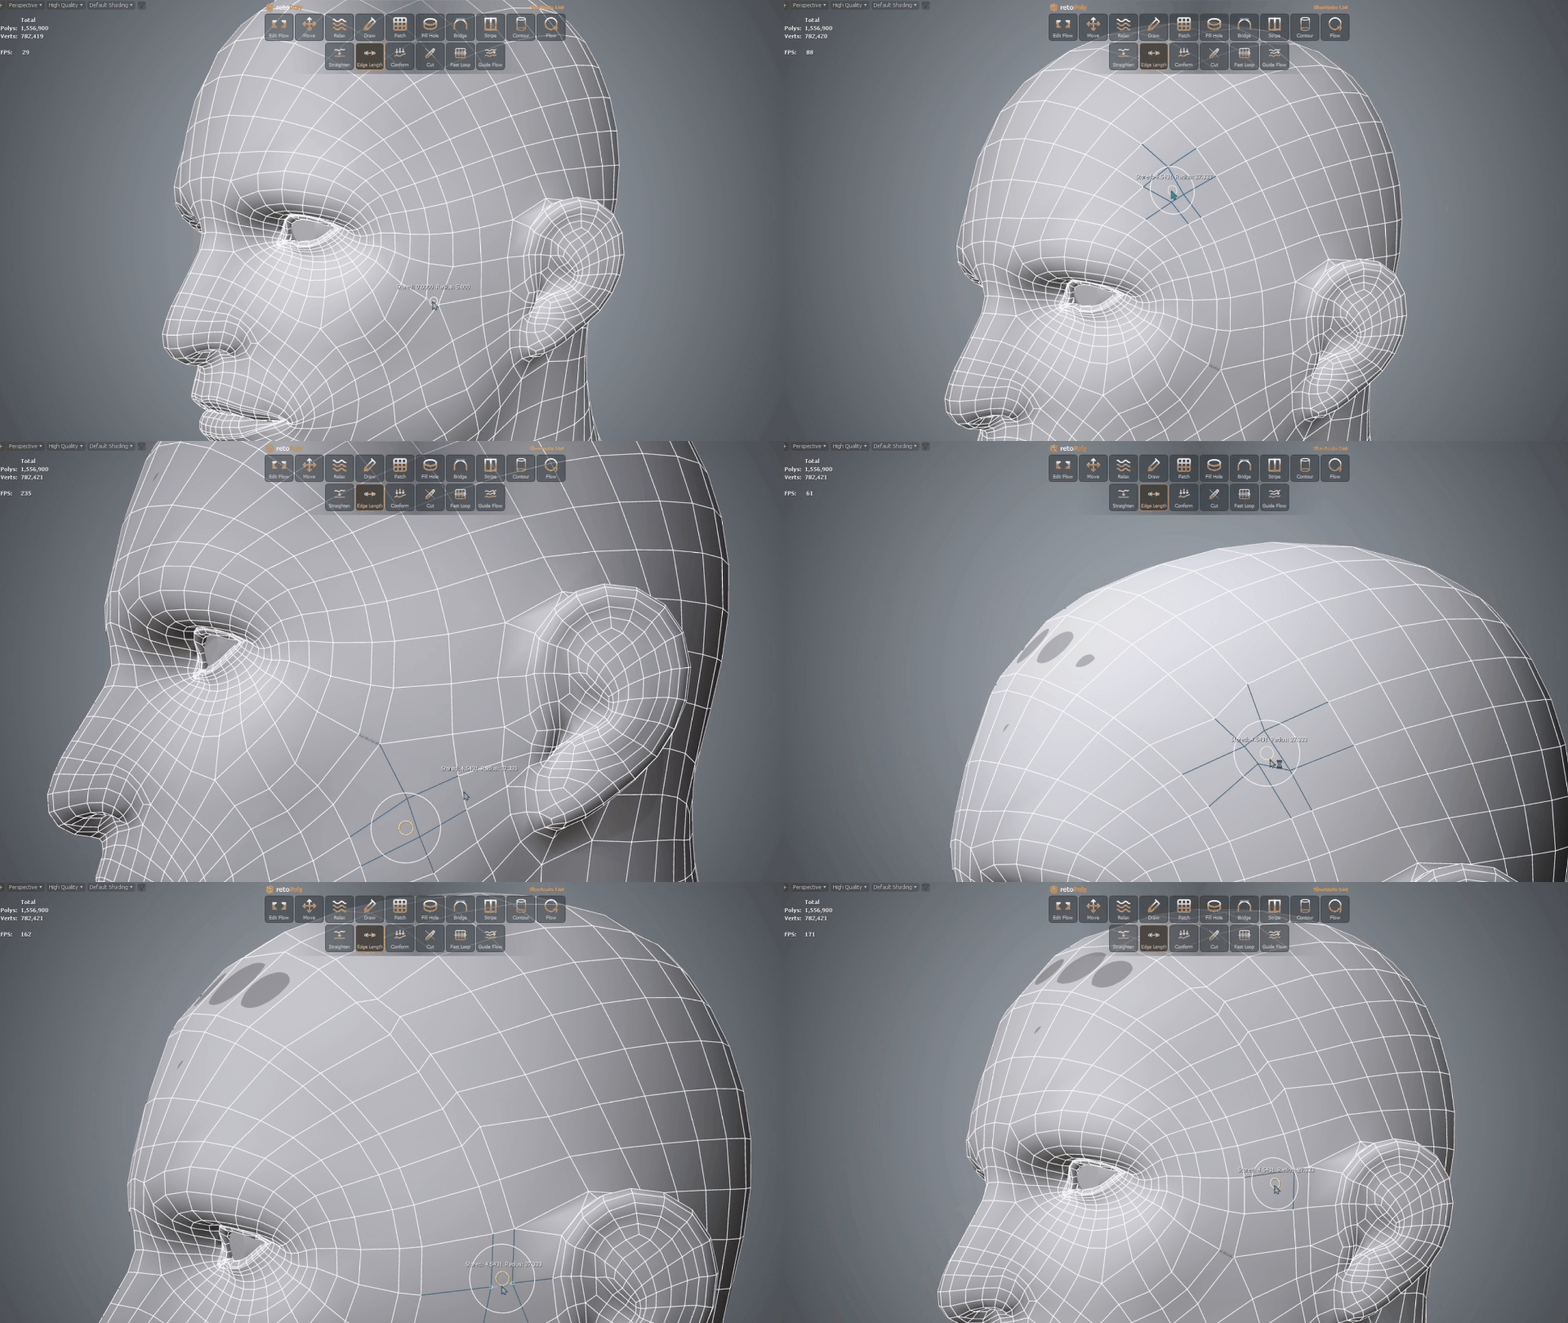
Stores one reference edge length and paints that length onto other edges under a brush.
| Input | Action |
|---|---|
| Ctrl + LMB | Store the length of the yellow highlighted edge. |
| LMB drag | Apply the stored length to the yellow highlighted edge / stroke. |
| Ctrl + Shift + Alt + LMB drag | Adjust the Edge Length brush radius. |
| RMB | Commit the current edit and exit. |
Projects retopology vertices under the brush directly onto the High Poly using the current Offset.
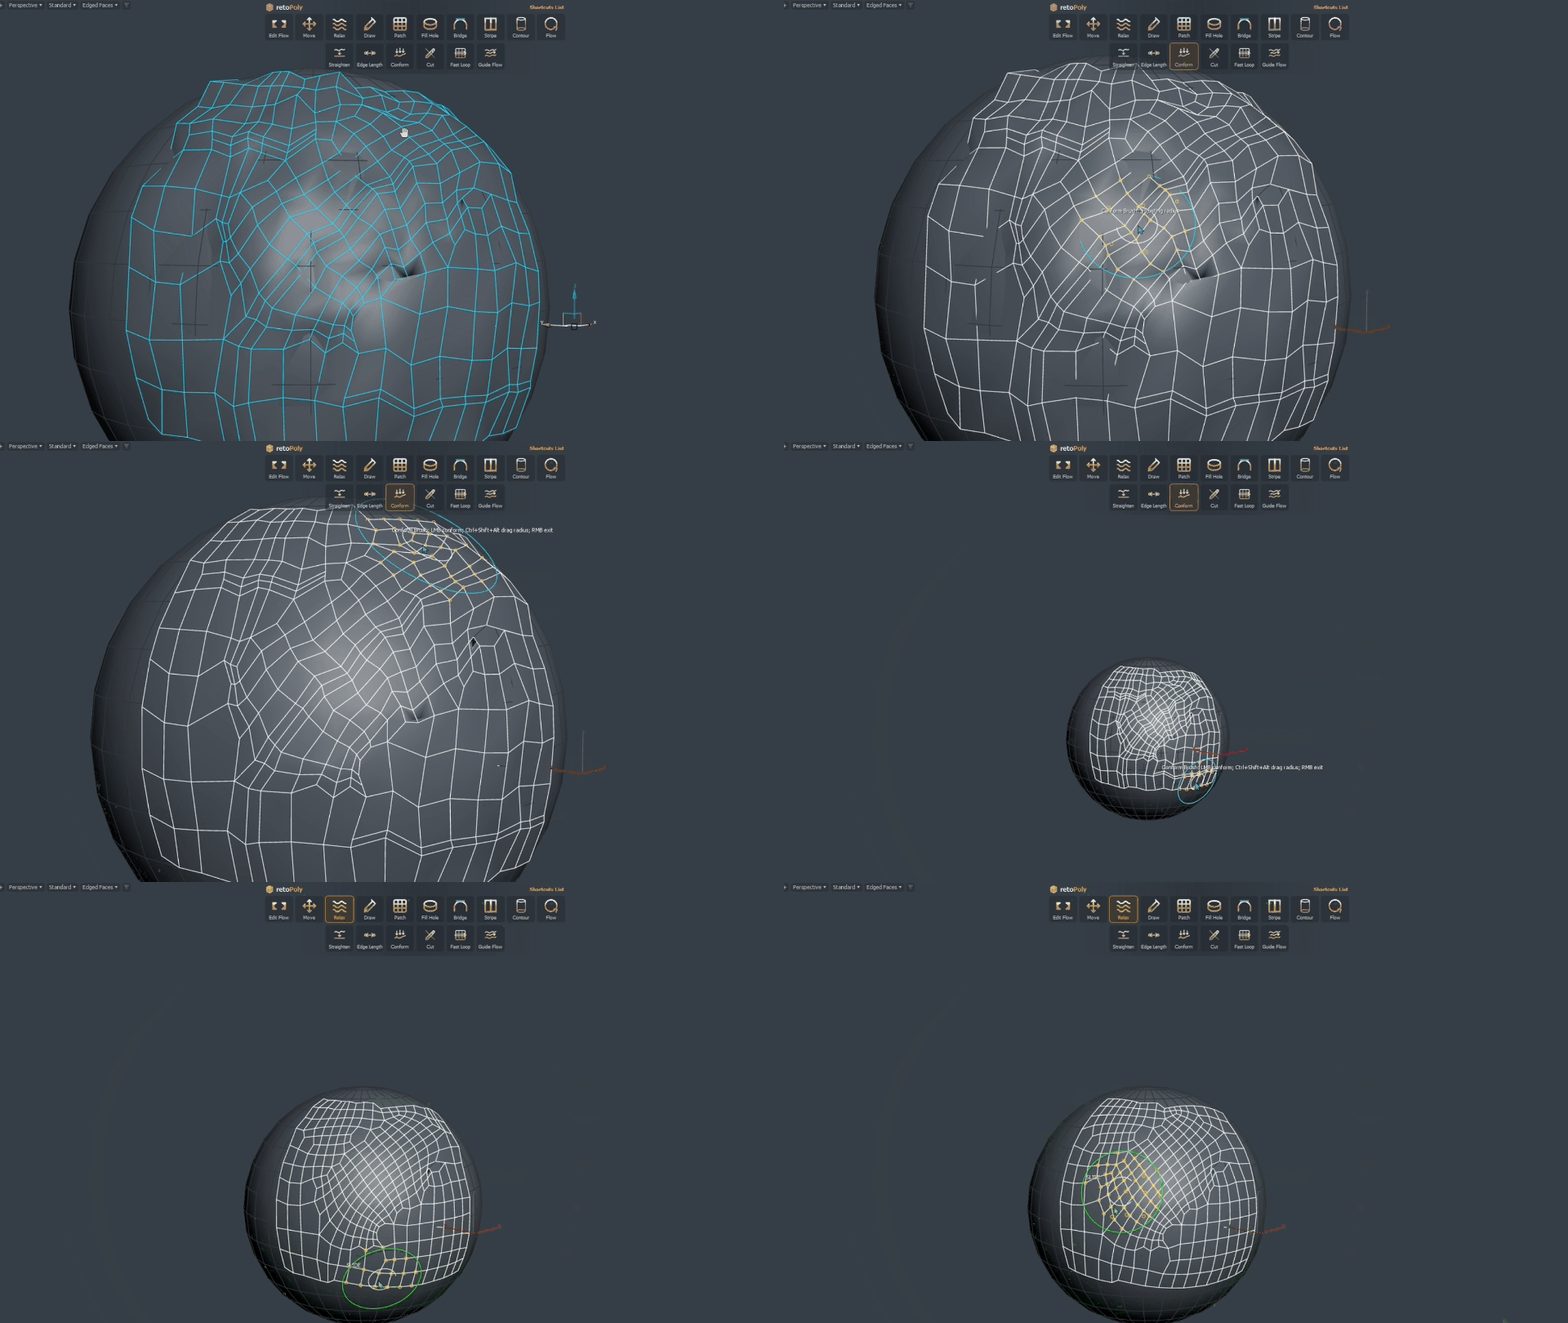
| Input | Action |
|---|---|
| LMB drag | Project retopo vertices under the brush to the high poly using the current Offset. |
| Ctrl + Shift + Alt + LMB drag | Adjust Conform brush radius. |
| RMB | Commit the current stroke and exit. |
Cuts between endpoints in unfrozen topology. The last created point becomes the start of the next cut, enabling continuous cutting.
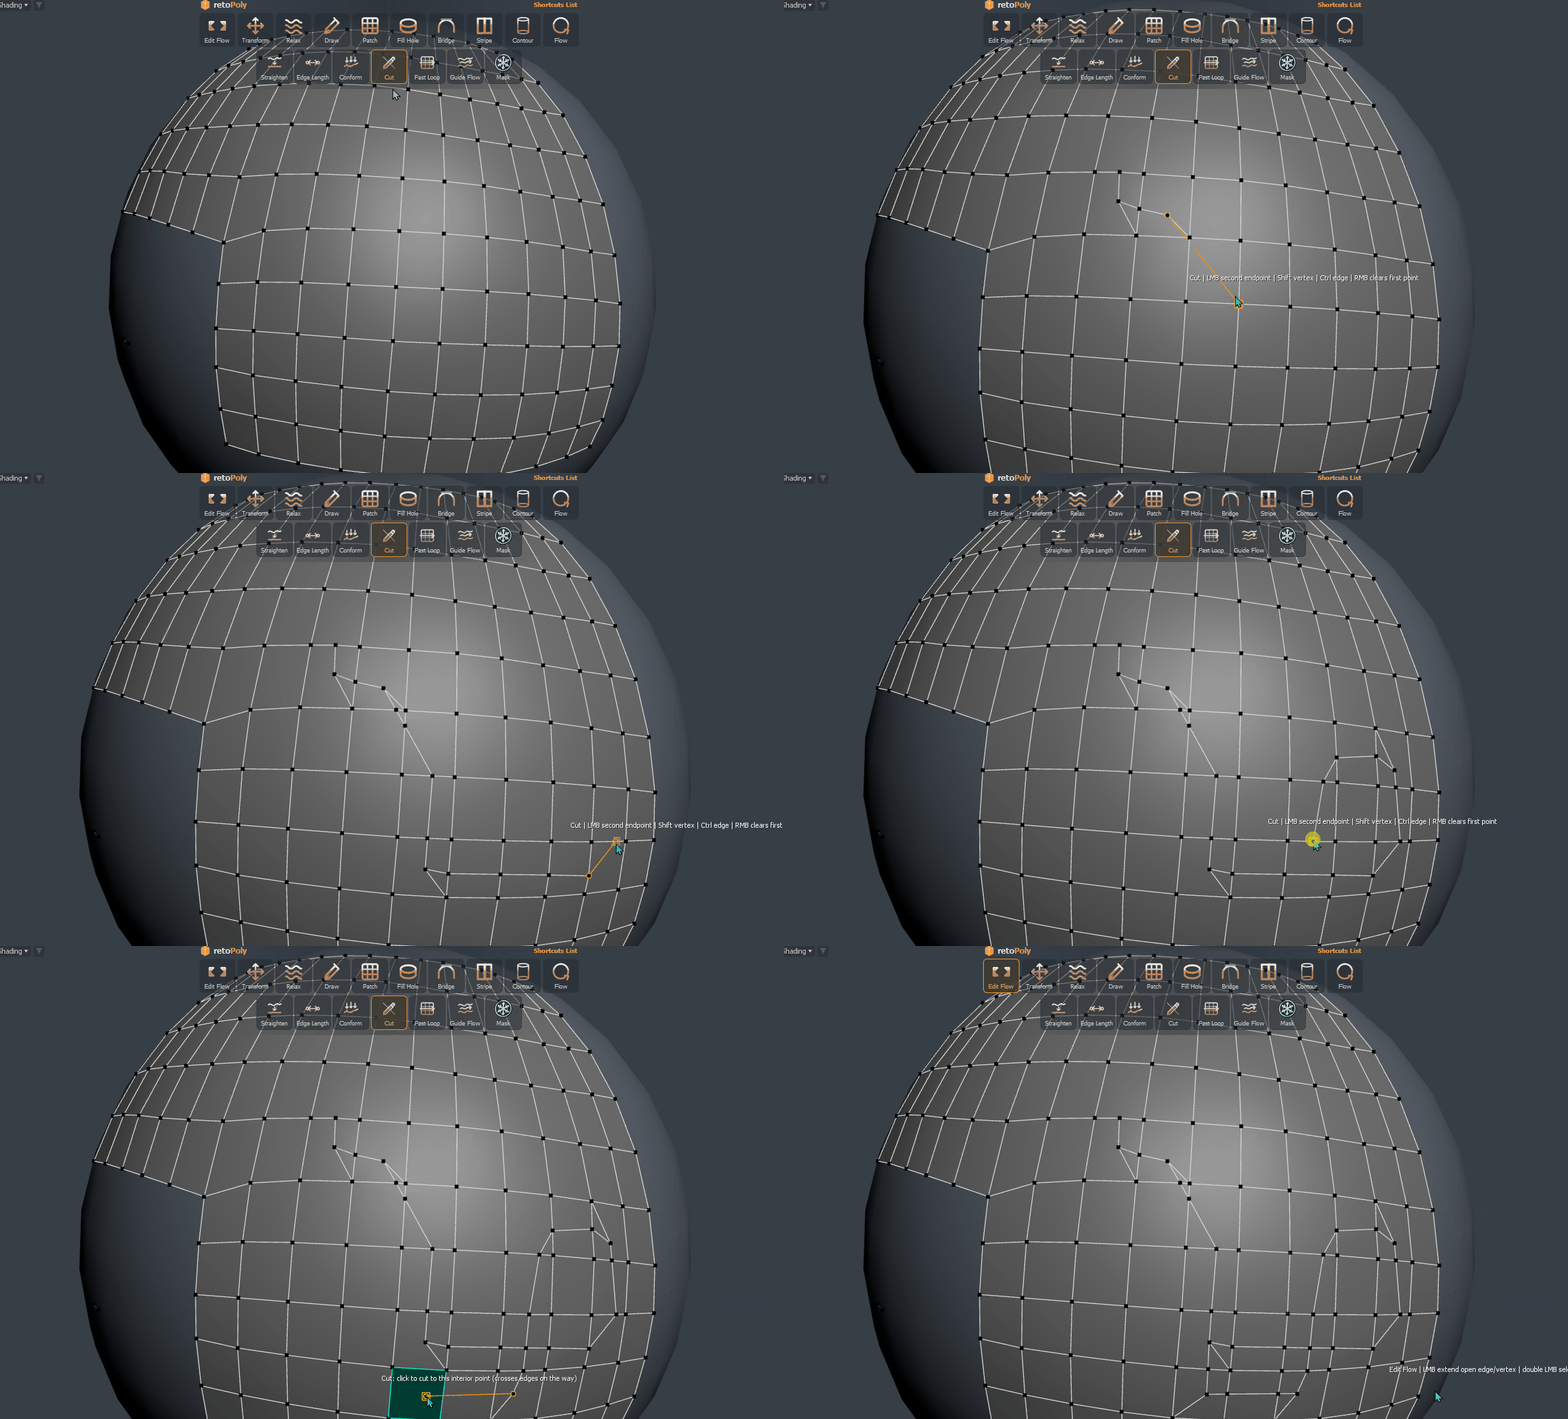
| Input | Action |
|---|---|
| LMB click two endpoints | Cut between endpoints. With path cutting enabled the cut may cross multiple polygons; the last result continues the chain. |
| Shift + LMB | Snap the endpoint to the nearest vertex of the hovered polygon. |
| Ctrl + LMB | Snap the endpoint to the nearest edge of the hovered polygon. |
| Alt + LMB | Remove the hovered internal edge. |
| RMB | Clear the first endpoint. RMB again exits when no endpoint is active. |
Inserts an edge loop across a connected strip of unfrozen quad faces, supports optional ring limits, and can remove an existing continuous loop.
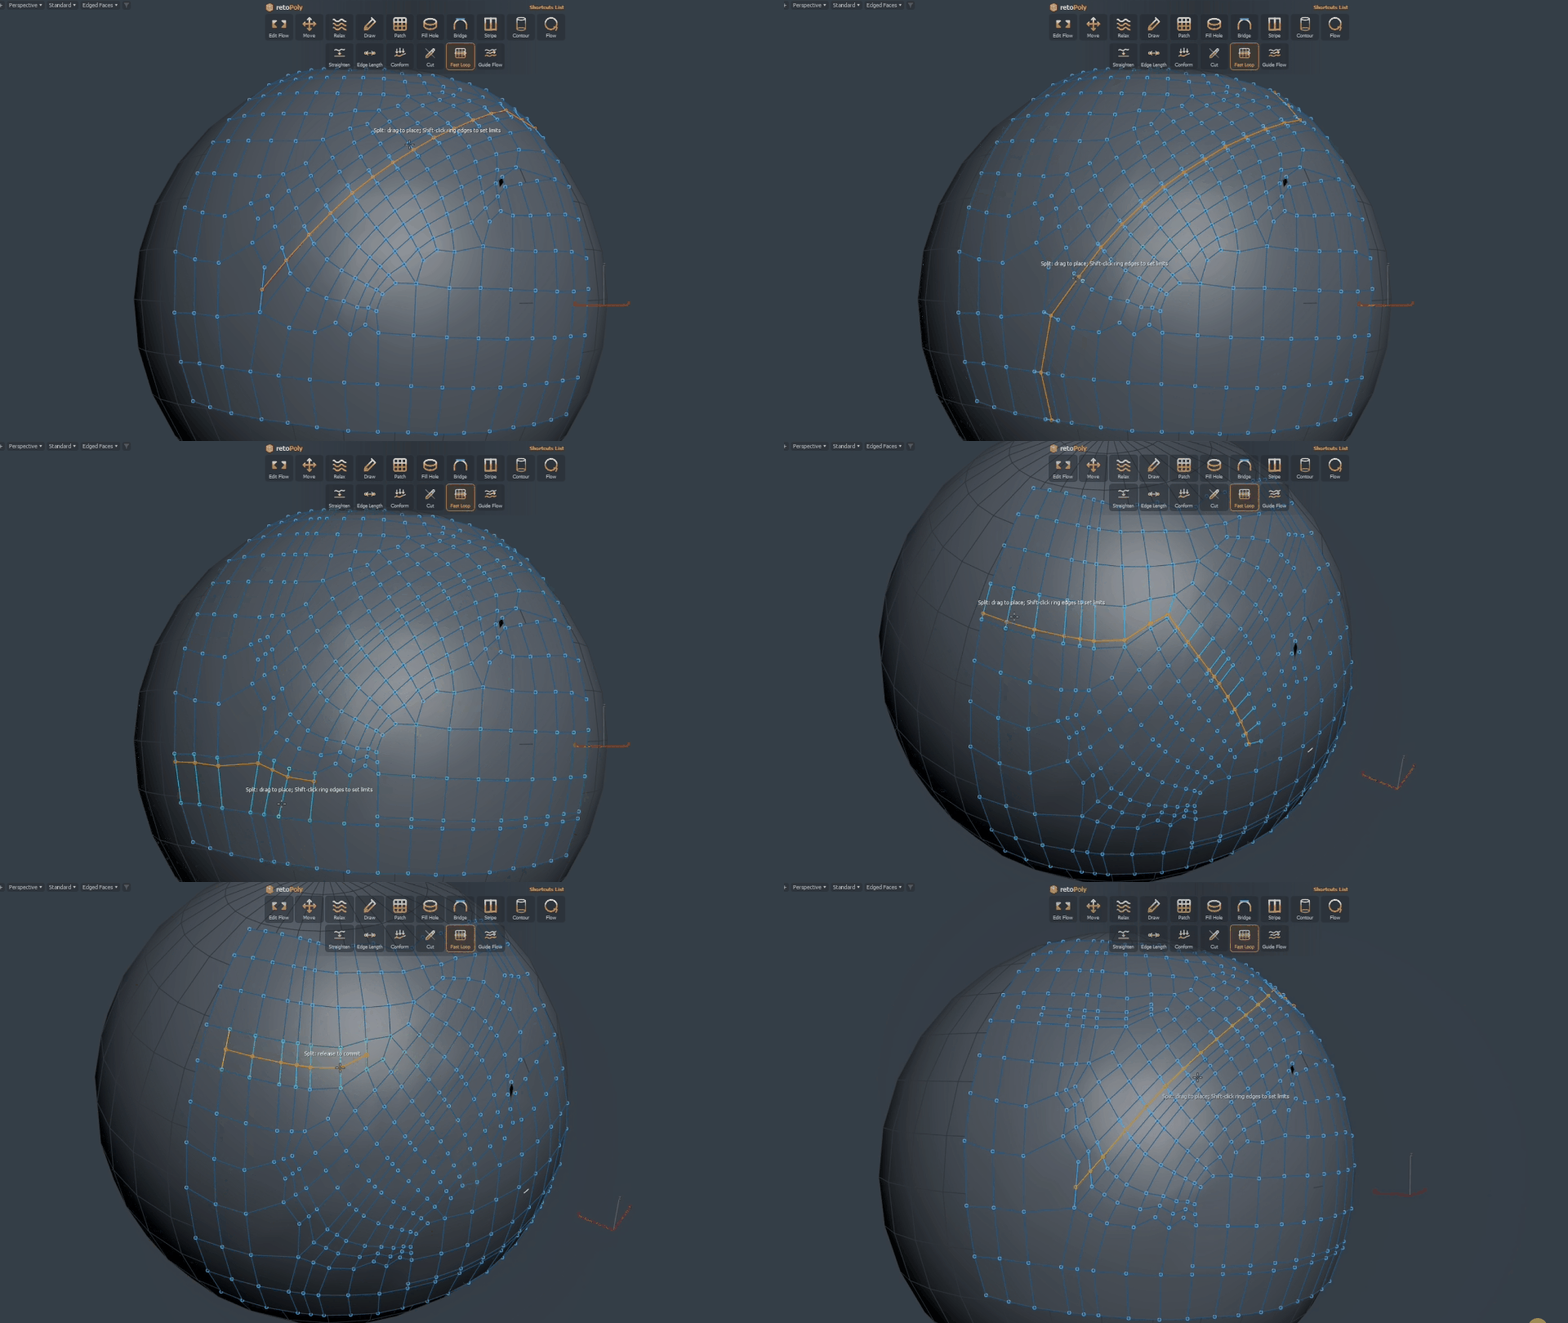
| Input | Action |
|---|---|
| Hover a quad edge | Preview the connected edge ring. |
| LMB drag | Set the new loop position; release commits the loop. |
| Shift + LMB on ring edges | Set the first and second optional limits. |
| Alt + LMB on an edge loop | Remove that continuous interior edge loop. |
| RMB | Clear active limits. RMB again exits when no limits are set. |
Deforms nearby interior retopology vertices along a drawn guide while keeping open border vertices fixed.
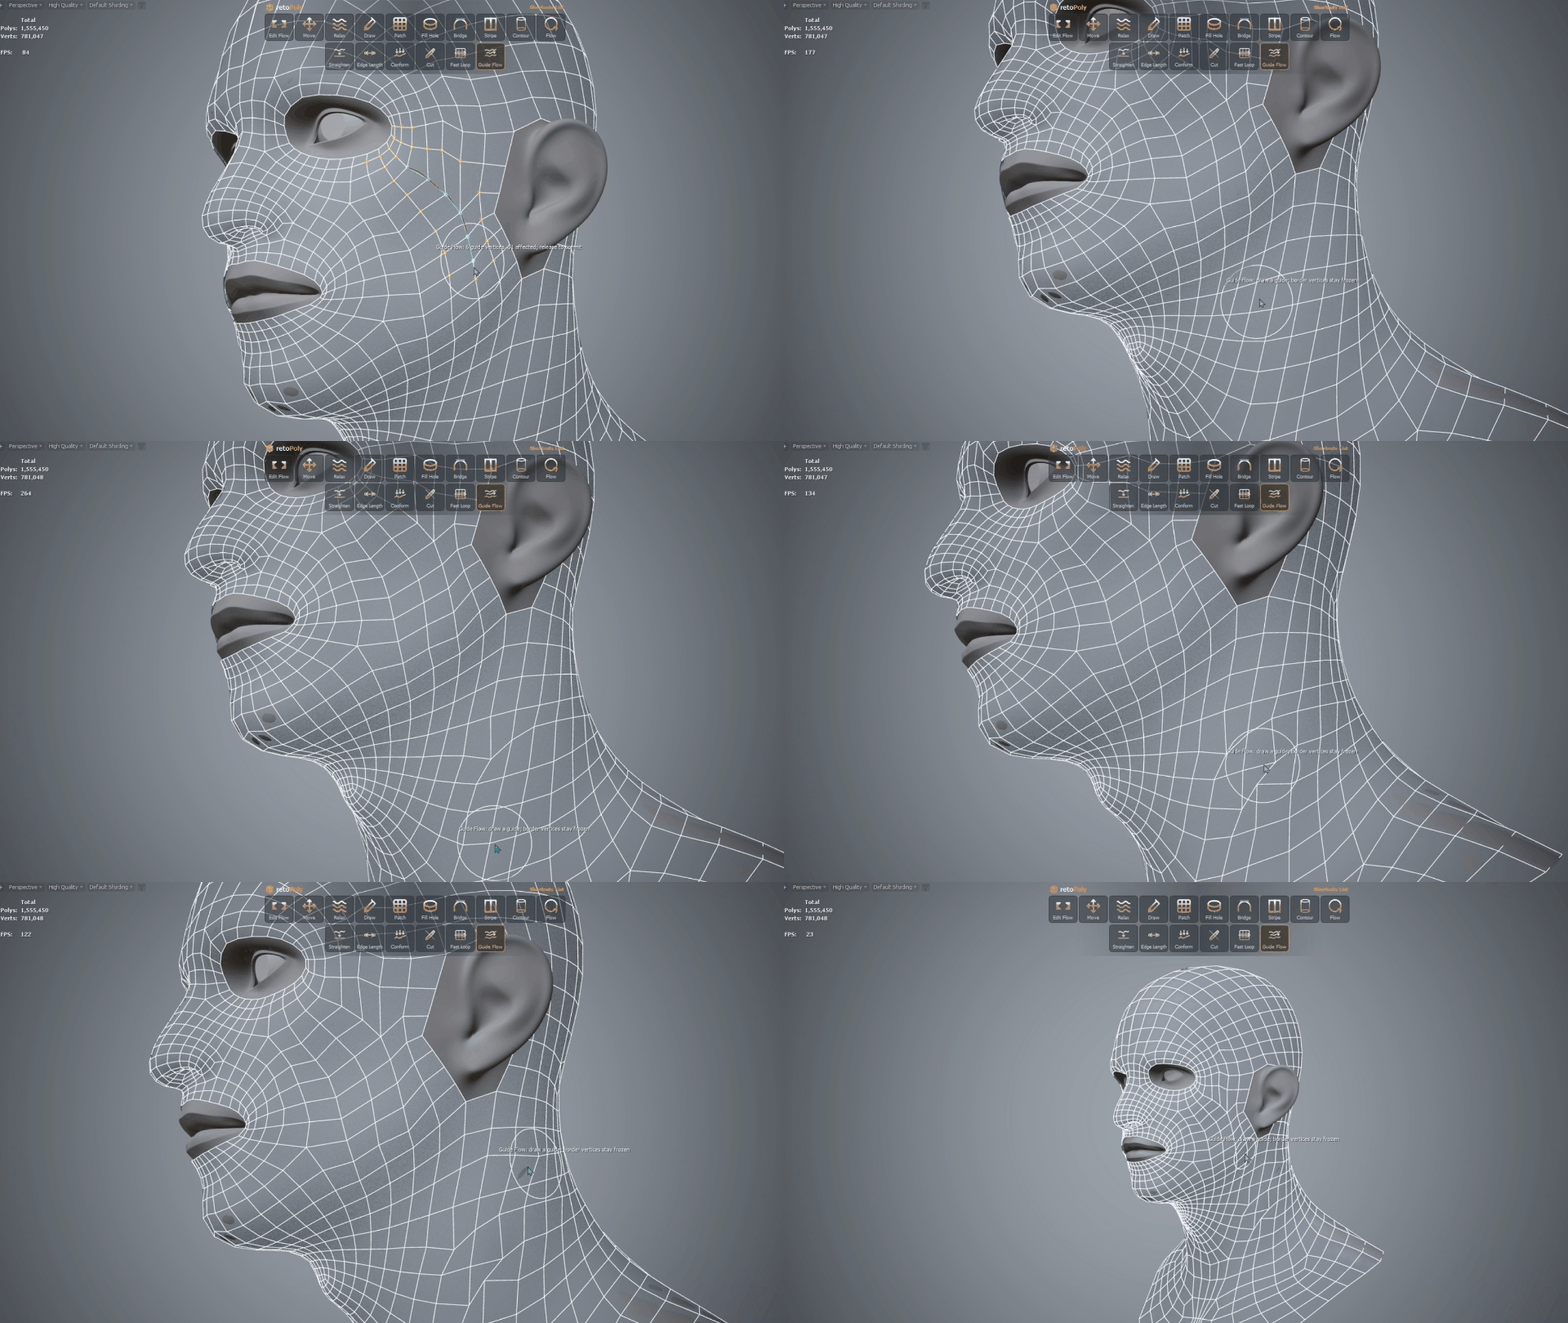
| Input | Action |
|---|---|
| LMB drag | Draw a guide, deform nearby topology, conform moved vertices, and keep open borders fixed. |
| Release LMB | Commit the guide stroke and remain in the tool for another stroke. |
| Ctrl + Shift + Alt + LMB drag | Adjust Guide Flow radius. |
| RMB | Cancel the current action and exit. |
Paints protected Frozen Faces directly on the retopology mesh. Frozen faces are displayed in light blue and are ignored by destructive topology operations that support Frozen Faces.
| Input | Action |
|---|---|
| LMB drag | Freeze faces detected by the brush. |
| Ctrl + LMB drag | Continue and grow the connected frozen region under the brush. Begin the stroke on an already frozen face. |
| Alt + LMB drag | Unfreeze faces detected by the brush. |
| Ctrl + Shift + Alt + LMB drag | Adjust Mask brush radius. |
| RMB | Commit the current stroke and exit. |
#8CCFFF). The brush also previews the next affected faces while painting.Only vertices created or moved by the current operation are considered sources. Existing untouched vertices remain stationary and are not globally collapsed.
Open or selected borders are emphasized in orange. Draw shows its detected source border in yellow/amber, generated Edit Flow faces receive a blue post-commit highlight, Frozen Faces use a persistent light-blue overlay, and Show Cage uses the user-selected cage color.
The modifier reconstructs polygon topology from the input and hides invisible triangulation diagonals, preserving authored quads and n-gons for editing.
Preview tools commonly use RMB to commit, clear or exit depending on state. Brush tools normally commit the active stroke and exit on RMB. Use the live cursor hint for the exact current action.
Move to 0: X/Y/Z clamps the selected components to the real world zero plane even when the node is translated, rotated, scaled or has an object offset. No Reset XForm is required.
Use Show Cage together with 3ds Max Show End Result to read the authored topology under TurboSmooth or another upper modifier. Vertex Ticks are enabled automatically while retoPoly is selected.
| Problem | What to check |
|---|---|
| retoPoly is not listed | Confirm that the matching .dlm is copied directly into C:\Program Files\Autodesk\3ds Max <release>\Plugins\, then restart 3ds Max. |
| The palette does not appear | Confirm that the .dlm matches the running 3ds Max release and that the retoPoly modifier entry itself is selected in the Modify panel. The palette should open automatically; Open retoPoly UI remains a manual fallback. After replacing a plug-in build, restart 3ds Max. |
| Tool buttons are disabled | Add at least one valid High Poly source with Add HP.... |
| The palette disappears | This is expected when retoPoly is no longer the active modifier entry. Select retoPoly in the stack again and the palette opens automatically. |
| Activation fails | Check internet access, copy the exact approved email and key, remove leading or trailing spaces, and try Activate again. |
| Request License does not open | Check the default web browser and security software, then use the support email shown at the top of this page. |
| Number keys do not activate tools | Confirm that retoPoly is the selected modifier and at least one High Poly source is assigned. Check the retoPoly action group in keyboard customization. |
| A topology operation is rejected | Check for Frozen Faces, branching edge selections, disconnected borders, non-quad rings or invalid endpoint combinations. Use Mask with Alt + LMB to unfreeze a protected region. |
| Auto Weld changes too much | Lower the threshold. The operation is scoped, but a large threshold can still merge newly created or actively moved vertices into nearby valid targets. |
| TurboSmooth hides the original topology | Enable Show End Result in 3ds Max and Show Cage in retoPoly. Pick a contrasting cage color from the swatch if needed. |
| Vertex dots disappear after leaving retoPoly | This is expected. retoPoly temporarily enables the node's native Vertex Ticks display only while the retoPoly modifier entry itself is selected. |
| Move to 0 does not use the local pivot plane | By design, X/Y/Z target the true world-space zero planes. This keeps symmetry seams correct without Reset XForm. |
| Draw extends from the wrong border span | Watch the yellow/amber border preview before release; it shows the exact existing boundary span Draw has detected. Start closer to the intended open border and shorten/reposition the stroke if the preview is wrong. |